Delta Laser Engraver Uses Inkscape for G-Code

[Z LeHericy] has a SeeMe CNC Rostock Max 3D printer, and a 2W WickedLasers Spyder Artic blue laser. Naturally, he had to try strapping them together.
Delta Laser Engraver Uses Inkscape for G-Code

Most of our homemade laser engravers featured here use recycled DVD burner diodes, and while they certainly work, they leave a bit to be desired… Well, if you want more power, let us introduce the Class 4 Artic Spyder 2W blue laser from WickedLasers — a company that sells super high-powered lasers to anyone who can afford them — because that’s a great idea!

Safety concerns aside — wear your darn laser goggles! This pair can etch wood and leather quite well. He’s been using it to etch celtic knots onto pieces of leather. To do this he’s used Inkscape to convert a .BMP of the knot into a vector image, and then using the G-Code tools included with Inkscape he can create a tool path for the printer. The finished leather looks awesome – Stick around after the break to see the laser in action!

read the rest of article...

Ninja-Drillpress-Skills Produced this Glow Plug Extruder

Still looking to make your own 3D printer? Don’t have many tools or a big budget? Well, [Adam Kemp] has just the hack for you — a DIY extruder that can be made with only a drill press and a few hand tools. First, a little background. [Adam] loves the nitty gritty side of 3D printing, so he’s managed to build his own printer almost completely out of recycled parts from printers, scanners, etc. Unfortunately, there’s not much of an option when it comes to the extruder. Almost all designs online feature 3D printed parts. Not wanting to admit defeat, he came up with this clever glow plug extruder design.
Ninja-Drillpress-Skills Produced this Glow Plug Extruder
As you can imagine, it requires a lot of drilling, and it would be a heck of a lot easier on a mill — but that’s not the point here. He even goes into detail on how to hob the extruder feed wheel using nothing but a tap, a drill press, some skateboard bearings, and a few washers and nuts. The entire guide is great, so if you want to feel like MacGyver for a few hours and you need a good extruder, try it out! 
To see the extruder in action, stick around after the break.

read the rest of article...

Roving Hexapod Poops Out 3D Prints

[Jia Wu, Mary Sek, and Jeff Maeshiro], students  at the California College of the Arts (CCA) in San Francisco, took on the task of developing a walking 3D printer. The result is Geoweaver, a hexapod robot with a glue gun extruder system. Hackaday has seen walking CNC machines before, but not a 3D printer. Geoweaver uses two servos on each of its six legs to traverse the land. The team was able to program several gaits into the robot, allowing it to traverse uneven terrain.
Roving Hexapod Poops Out 3D Prints
Walking is hard enough on its own, but Geoweaver also uses a glue gun based extruder to make 3D prints. The extruder head uses two servos to swing in a hemispherical arc. The arc is mapped in software to a flat plain plane, allowing the robot to drop a dollop of glue exactly where it is programmed to. Geoweaver doesn’t include much in the way of on board processing – an Arduino Uno is used to drive the 15 servos. Those servos coupled with a glue gun style heater pull quite a bit of power, which has earned Geoweaver nicknames such as Servo Killer, Eater of Shields, Melter of Wires, and Destroyer of Regulators.

Geoweaver’s prints may not be much to look at yet, however the important thing to remember is that one of the future visions for this robot is to print on a planetary scale. Geoweaver currently uses reacTIVision to provide computer control via an “eye in the sky”. ReacTIVision tracks a fiducial marker on the robot, and applies it to a topographical map of the terrain.

This allows Geoweaver to change its height and print parameters depending on the flatness of the ground it is printing on. On a scaled up Geoweaver, reacTIVision would be replaced by GPS or a similar satellite based navigation system.  Most of the software used in Geoweaver is opensource, including Grasshopper and Firefly, written by the team’s professor, [Jason Kelly Johnson]. The exception is Rhino 5. We would love to see an option for a free or open source alternative to laying out ~$1000 USD in software for our own Geoweaver.


read the rest of article...

3DMonstr Printer: 8 Cubic Feet Of Build Volume

So you’re looking at 3D printers, but the build volumes for the current offerings just aren’t where you’d like them to be. [Ben Reylblat] had the same problem and came up with the 3DMonstr, an enormous printer that has (in its biggest configuration) a two foot cubed build volume, four extruders, and the mechanical design to make everything work.
3DMonstr Printer: 8 Cubic Feet Of Build Volume
Most of the ginormous 3D printers we’ve seen are basically upgraded versions of the common table-top sided models. This huge Ultimaker copy uses the same rods as its smaller cousin, and LeBigRap also uses woefully undersized parts. The 3DMonstr isn’t a copy of smaller machines, and instead uses very big motors for each axis, ball screws, and a proper welded frame. It’s highly doubtful anyone will call this printer a wobblebot.

The 3DMonstr comes in three sizes: 12 inches cubed, 18 inches cubed, and 24 inches cubed, with options for two to four extruders.  We caught up with the 3D Monstr team at the NYC Maker Faire, and from first impressions we have to say this printer is freakin’ huge and impeccably designed.
read the rest of article...

Trainable Robotic Arm

When [Robert] realized Adafruit is now selling analog feedback servos, he decided he just had to make a programmable robot arm that could be trained like the commercially available Baxter robot.
The neat thing with the analog feedback servos is it takes all the complexity out of training a robot.
Trainable Robotic Arm
All you have to do is put the robot in teach mode, physically move the robot’s joints to the positions you want, and save your program! Depending on your application, it certainly beats trying to work out the fun kinematics equations…

Anyway, the full guide available on Adrafuit’s learning system provides instructions on how to build your own arm from scratch (well, with a 3D printer) or how to replace the servos in a pre-made toy robotic arm you might already have sitting around. It’s very thorough and includes all the code you need for your Arduino too.

Stick around after the break to see how the robot works!

read the rest of article...

Custom Rostock 3D Printer Makes Use of IKEA Components

After discovering 3D printers, [Turi] had to make one. This past summer he did, and it looks fantastic. He chose the Rostock design not only because it can print big parts quickly, but also because of its mesmerizing operation. 3D printers are generally fun to watch for the first few minutes, but Rostocks tend to have an even more robotic appeal in the motion of its end effector (robotics lingo for tool head).
Custom Rostock 3D Printer Makes Use of IKEA Components
The cool part of this build is [Turi's] choice of enclosure. He had an IKEA cabinet collecting dust in his basement, so he decided to make use of its drawers for the main structure of the Rostock. A bit of wood work and some matte black spray paint later, and he has one great looking enclosure! The rest of the build was pretty standard, making use of 3D printed parts, a RAMPS 1.4 control board mounted on an Arduino Mega, and a computer power supply. He did make his own control arms using carbon fiber arrows, though!

To see it up close and in action, check out the quick video after the break.

read the rest of article...

3D Printed, Solderless Circuits

If you’re looking for yet another alternative to etching your own PCBs, then check out this new Instructable on 3D printing test circuits!
3D Printed, Solderless Circuits
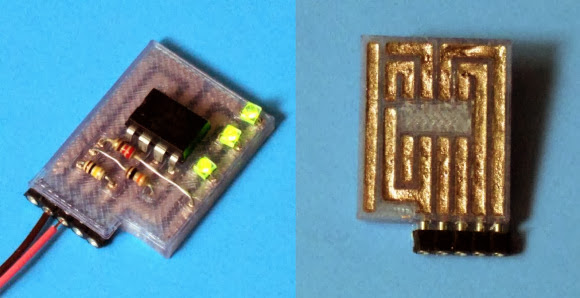
[Mikey] decided to try out this method when he needed a small board prototype. He designed the perfboard to have a standard thickness—only 1/16th thick (~1.6mm)—with thin, recessed channels on one side and through holes on the other. [Mikey's] circuit board allows you to stuff your components in, hold them down with a piece of tape, and then fill the channels with some kind of conductive material. In this example he’s used a highly conductive paint.


This 3D printed option probably won’t suit all your circuit-building needs, but it could provide an excellent shortcut for your next hack! As always, there’s a video after the break.
read the rest of article...

A Really Big Extruder For Exotic Filaments

Even with ABS, PLA, Nylon, HIPS, and a bunch of Taulman filaments, the world of 3D printers is missing out on a great supply of spools of plastic filament. Plastic welding rod is available from just about every plastics supplier, and in more variety than even the most well-stocked filament web shop.
A Really Big Extruder For Exotic Filaments
This Kickstarter hopes to put all those exotic plastic welding rods to good use. Instead of being designed to only use 1.75 and 3mm filaments, this guy will extrude welding rods up to 4.76mm in diameter. This opens the door for 3D printed objects made out of PDPF, PVC, Polypropylene, Polyethylene and other high molecular weight plastics. Because these welding rods are much bigger than the usual plastic filament, this extruder also has the option for a very beefy NEMA 23 motor. It’s the perfect solution if you’re planning on building a homebrew ludicrous-sized printer, or you just to show off just how awesome you are.
read the rest of article...

A Rostock Welding 3D Printer?

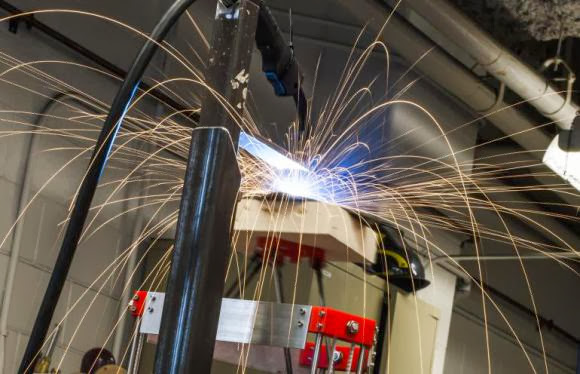
Tired of printing in boring old plastic? Why not try metal? Researchers at Michigan Tech have come up with an open source reprap style design of a 3D printer that can print metal for only $1200. The paper was published in IEEE Access a few weeks ago that it outlines the design and testing of this printer, which is basically an upside down Rostock with a MIG welder used as the extruder. As you can imagine, the quality and resolution of the parts isn’t that amazing (hang around after the break to see an example), but this is an exciting step forward for 3D printing. Equipped with this and a mill and the possibilities are quite endless!
A Rostock Welding 3D Printer?
Did we mention how cheap welding wire is? A cost that could add up is the shielding gas though, but as a user on Reddit points out, an upgrade for this machine could be an enclosed build chamber which could then just be flooded with the gas. Alternatively, would flux-core welding wire work?
A Rostock Welding 3D Printer?
As you can see, the printed part is rather rough — but it is solid carbon steel (ER70S-6). Combine this with a quick machining pass on a CNC and you’ll have a prototyped metal sprocket that barely wasted any material! We can’t find the video right now, but there was a commercial machine that is basically the same concept, using a modified 6-axis robotic welder. Its main purpose was for the production of large mostly hollow parts, like a wing casing on a plane. Instead of machining a giant chunk of metal, it could be printed and then cleaned up with a single machining pass — considerably less material processed.
So who wants to try building one?

[via Reddit]
read the rest of article...

3D Printer Exhaust

[Malcolm] finally got fed up with the fumes produced by his 3D printer, so he decided to setup this rather extensive fume exhausting system. He already has a pretty awesome setup with his Type A 3D printer inside of a filing cabinet, with a plastic tote above it to keep his filament from absorbing too much water. But as you know, the fumes released while printing ABS are actually pretty bad for you.
3D Printer Exhaust
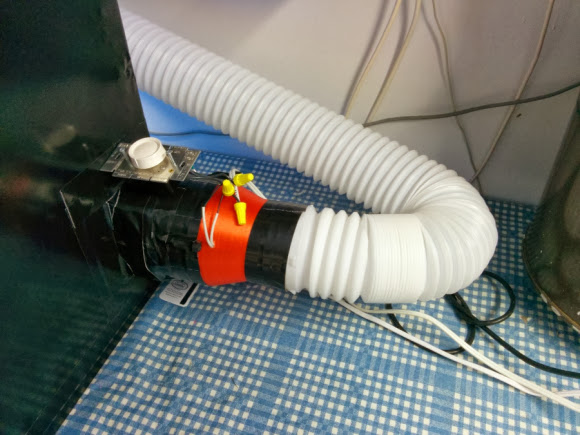
 With this in mind he 3D printed adapter rings and fitted a fan salvaged from a space heater to the outside of his filing cabinet. A dimmer switch provides variable fan speeds and some dryer vent tubing reroutes the fumes to central vac piping which then goes directly outside. When the system is not in use the piping can be plugged to prevent cold air from entering the house. It’s a fairly clean build but [Malcolm] wants to make a nicer enclosure for the fan and speed control circuit.


The major problem we see with doing something like this is removing too much heat from the build chamber which can always affect print quality. Do you vent your 3D printer?
read the rest of article...

A Six Part CNC Machine

CNC machines are impressive pieces of kit. We’re all for seeing the big, burly, impressive machines, but there’s something to be said about seeing how small they can get. [Jay] has what is probably the most minimal CNC plotter we’ve ever seen, built from only six 3D printed parts.
A Six Part CNC Machine
[Jay]‘s plotter is based on the Piccolo, an exceedingly small-scale CNC platform that can be built for $70 with laser-cut parts. This version, though, uses only six parts that can be downloaded from Thingiverse. Powered by an Arduino and two micro servos, this CNC plotter would be a great introduction to CNC for any robotics club or hackerspace tutorial series.
[Jay] has been doing some awesome work with CNC plotters; we saw his large format Plotterbot earlier this month, and his giant plotted HaD logo with HaD infill poster was a great submission to our Trinket contest.
Video of [Jay]‘s plotter in action available after the break.
read the rest of article...