A Touch Scroll Wheel via OpenSCAD

Recent experiments with the Arduino CapSense library led [Bryan] around the Internet looking for interesting applications. He hit upon a very cool touch scroll wheel made entirely with PCB traces, but the geometry – three interleaved zig zags is impossible to build in the decidedly ungeometric Eagle PCB package. One thing leads to another and now [Bryan] has a cap touch wheel Eagle part designed entirely in OpenSCAD.
A Touch Scroll Wheel via OpenSCAD
The touch scroll wheel implementation [Bryan] found came from an ST touch controller datasheet and used oddly-shaped patterns to create a capacities sensor. Eagle is terrible for designing anything that isn’t laid out at a 45 degree angle, so he fired up OpenSCAD to draw these triangles. Importing into Eagle was another challenge, but a quick Ruby script to convert a DXF file into a set of coordinates for Eagle’s POLYGON command made everything very easy.
read the rest of article...

Operation StratoSphere

Panoramic photos are nice, however a full 360 degree x 180 degree, or spherical panorama would be even better. [Caleb Anderson] decided to take this concept much further, attempting to extract panoramic photos from video taken at 100,000 feet using a high-altitude balloon and six GoPro cameras.
Operation StratoSphere
The overview of this project can be found here, and gives some background. The first task was to start prototyping some payload containers, which for a device that you have little control over once out of your hands is quite critical. As well as some background, there’s a cool interactive panorama of the first test results on this page, so be sure to check it out.


The “real” hacking in this experiment wasn’t a matter of putting a balloon into the stratosphere or recovering it, however. Chaining these images together into pictures was a huge challenge, and involved a diverse set of skills and software knowledge that most of our readers would be proud to possess. There are several videos in the explanation, but we’ve embedded one with the cameras falling out of the sky. Be sure to at least watch until (or skip to) just after 1:05 where all the cameras impressively survive impact!
read the rest of article...

Interview With [Damien George], Creator of the Micro Python Project

[Damien George] just created Micro Python (Kickstarter alert!), a lean and fast implementation of the Python scripting language that is optimized to run on a microcontroller.
Interview with [Damien George], Creator of the Micro Python project
It includes a complete parser, compiler, virtual machine, runtime system, garbage collector and was written from scratch. Micro Python currently supports 32-bit ARM processors like the STM32F405 (168MHz Cortex-M4, 1MB flash, 192KB ram) shown in the picture above and will be open source once the already successful campaign finishes. Running your python program is as simple as copying your file to the platform (detected as a mass storage device) and rebooting it. The official micro python board includes a micro SD card slot, 4 LEDs, a switch, a real-time clock, an accelerometer and has plenty of I/O pins to interface many peripherals. A nice video can be found on the campaign page and an interview with the project creator is embedded after the break.


[Mathieu] Hi Damien, thanks for taking the time to answer our questions. After only a few days, your Kickstarter campaign was already successful. With 17 days to go, we look forward to seeing how many people will receive your boards once the campaign finishes.

[Damien] Thanks Mathieu/Hack-a-day for the opportunity to talk about Micro Python. I’m really excited about this project and it’s awesome to see such a positive response in the first few days of the campaign. I’ve tried to combine functionality with minimalism in the Micro Python board and I’m really looking forward to sending them out to all my backers.

[Mathieu] Our feeling at HaD is that many people might underestimate the work you put in to rewrite the Python scripting language from scratch. How many hours did it take you? Can you describe your process?

[Damien] Yes, it took some time, and lots of programming tricks, to get Micro Python to fit on a microcontroller. Let me say though that it’s not 100% Python: it has exactly the same grammar as Python 3.x, and can emit the same byte code, but the libraries (which make Python what it is) are not all there, yet. Using Micro Python definitely feels the same as using Python (it has REPL running on the board), and I’m trying to get as many libraries working as possible.

I’ve been working on Micro Python for just over six months, in my spare time. Probably clocked up over 700 hours by now. It’s been a lot of fun, selecting components, designing the PCB, soldering parts by hand (mostly with a hot-air gun — they are so awesome!), and writing the Python implementation itself.
The Micro Python software was initially running just on my PC, and I started from the beginning with a simple hand-written lexical analyser.
The next part, the parser, was tricky to write because I wanted it to be as small as possible (in code) and use as little RAM as I could get away with. I ended up encoding the grammar in a static data structure (using some C preprocessor magic) and writing a single 320-line non-recursive function to interpret this table on the fly and parse the Python source. The output of the parser is a parse tree, which is fed into the compiler.
For the compiler, I wanted to be able to emit native machine code, so that Python would run as fast as possible on the micro.
I needed to learn how to encode Thumb machine instructions for this bit, and then turn the stack-machine style code that comes out of the compiler into register-machine style, to take full advantage of the RISC CPU. I also implemented a byte code emitter and virtual machine, so that Micro Python can easily run on other hardware.

Eventually Micro Python was running on my PC, and then I ported it across to the microcontroller. This went surprisingly well and I had it running in a couple of days. Initially I did not have a memory manager, so it would quickly run out of memory on the micro, but then I implemented a simple mark-sweep garbage collector and that works really well.

[Mathieu] Did you write the complete bootloader related code yourself? Did you use any library and if so which ones?

[Damien] The bootloader is built in to the micro that I use: it’s DFU (device firmware upgrade) which means you just hold a few pins at certain logic levels and reset the chip, and then you can flash it over a USB connection. This also makes it easy for users to upgrade the Micro Python image without any special hardware, and means that you can never brick the device.
For the peripherals on the board (like GPIO pins and SD card controller) I used the standard STM libraries, and interfaced them to Micro Python. I also used the awesome FatFs library by [ChaN] to provide filesystem functionality.

[Mathieu] Did you already know everything that you needed to do when starting this project? Did you learn many things along the way?

[Damien] I can’t even begin to tell you how much I learned doing this project. I have in the past written a few programming languages, including ones that compile to machine code (x86), and I’ve had experience with many different microcontrollers. But putting everything together, from the hardware right up to the high-level software, exposes you to a whole new set of problems that you’ve got to learn to solve. For example, learning how to write USB device descriptors, learning how to layout a compact PCB, and even learning new ways of doing things in C!

[Mathieu] Could you point our readers to a few good reads on how to create a lexer, parser, compiler, garbage collector and virtual machine like you did?

[Damien] My knowledge came from so many different places: books, university courses, the internet, and just mucking about. I think implementing a language is one of the most satisfying programming tasks you could ever do, and it doesn’t have to be difficult. If you want to read a book, go for “Compilers: Principles, Techniques, and Tools” by [Aho], [Lam] and [Sethi], also known as the “Dragon Book”. If you just want to start hacking, set yourself the task of implementing a ”stack machine”, as that will give you the basic understanding of most of the pieces.

[Mathieu] A few people on IRC told us that you were accustomed to lengthy projects, could you tell us a bit more about other things you’ve done?

[Damien] My day job is as a theoretical physicist, and in this field you have projects like the LHC (Large Hadron Collider) that take more than 30 years. Of course, my personal physics projects don’t last this long, but it can still take years to go from the initial idea to finally writing up the research paper. My longest hardware project was undoubtedly building my CNC machine (which features at the end of the Kickstarter video). For this I designed my own stepper motor control boards, wrote firmware for an Atmel micro to do the high-level control (not G-code, but similar), designed and built the actual machine (that took over a year…) and wrote all the PC-side software. I even wrote a 3D modelling program to design the machine. Probably overkill.

I also spent the last year and a half building, with a friend, the website paperscape.org, which maps the scientific landscape of research papers. The longest part of this project was implementing (in Python) a LaTeX/TeX parser which could automatically extract bibliographic information to work out how papers are connected.

I think Micro Python has been the most fun and most challenging project that I have worked on so far. And there’s still heaps more to do. One thing I like about this project is the feedback I’m getting from people, and all their suggestion on how to improve Micro Python. I look forward to building up a community around this and having Micro Python running on all kinds of hardware, and doing all kinds of amazing things.
read the rest of article...

Mathematica and Wolfram On The Raspberry Pi

[Stephen Wolfram], possibly the only person on Earth who wants a second element named after him, is giving away Mathematica for the Raspberry Pi.
Mathematica and Wolfram On The Raspberry Pi
For those of you unfamiliar with Mathematica, it’s a piece of software that allows you to compute anything. Combined with the educational pedigree of the Raspberry Pi, [Wolfram] and the Pi foundation believe the use of computer-based math will change the way students are taught math.

Besides bringing a free version of Mathematica to the Raspberry Pi, [Wolfram] also announced the Wolfram language. It’s a programming language that keeps most of its libraries – for everything from audio processing, high level math, strings, graphs, networks, and even linguistic data – on the Internet. It sounds absurdly cool, and you can check out a preliminary version of the language over on the official site.

While a free version of Mathematica is awesome, we’re really excited about the new Wolfram language. If it were only an interactive version of Wolfram Alpha, we’d be interested, but the ability to use this tool as a real programming language shows a lot of promise for some interesting applications.
read the rest of article...

Automatic, custom Eagle schematics

It’s a simple fact that for every circuit you design, someone else has done it before. If you’re working on a high altitude balloon project, there’s already a project out there with a microcontroller, barometric pressure sensor, and an SD card somewhere out there in a corner of the Internet. Google will only help so much if you want to copy these previous builds, which led [Ben] to come up with a better solution. He took dozens of building blocks for basic digital projects and put them all into one really great interface called HackEDA.
Automatic, custom Eagle schematics
The premise is simple: most electronic projects are just electronic Lego. You connect your microcontroller to a sensor, add in a battery, throw in a few caps and resistors for good measure, and hopefully everything will work. HackEDA takes all those basic building blocks – microcontrollers, power sources, and sensors – and creates a custom Eagle schematic with all the parts your project needs
HackEDA is still very much in beta, so there aren’t a whole lot of building blocks to choose from.

That said, being able to generate an Eagle schematic with all the parts necessary for your next project is a boon. With this, all you need for a final circuit board is to create a new board file, hit the autorouter, and spend a half hour fixing whatever mess the autorouter made.
read the rest of article...

Interpreting Brainf*#k on an AVR

We won’t call it useless, but we will ask why [Dan] wrote a brainfuck interpreter for the AVR
It’s not generating code for the AVR; think of it more as a bootloader. To run a brainfuck program, [Dan] uploads it to the EEPROM inside his ATMega32, after which the microcontroller takes over and starts performing whatever instruction the brainfuck program tells it to do.
Interpreting Brainf*#k on an AVR
Because the whole thing runs off the EEPROM, the code size is limited to 1022 bytes. Enough for any brainfuck program written by a human, we think.As for why [Dan] would want an AVR to build an interpreter for a language that is nearly unreadable by humans, we honestly have no idea other than the common, ‘because it’s there’ sentiment.


There are some pretty cool projects out there that use brainfuck, including this genetic algorithm software developer. Right now, though, blinkey LEDs are enough to keep us happy, so you can see a video of brainfuck doing its thing on a LED bar display after the break.
read the rest of article...

Debian Linux on a PowerMac 7200

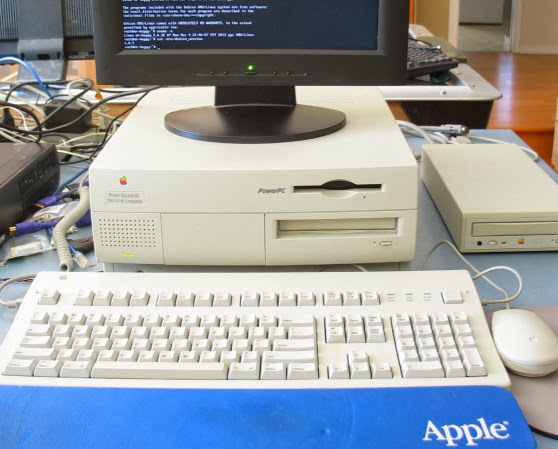
Those of us that run Linux on a modern or nearly-modern PC know that it’s a capable operating system.  It’s also (at least in my case with Ubuntu) extremely easy to install on a semi-modern computer. On a mid-90s era PowerMac 7200, things aren’t quite so simple.
Debian Linux on a PowerMac 7200
In a testament to both his technical ability, and possibly even more so his tenacity, [Chris] was able to get Debian 6.07 running on a PowerMac destined for destruction. He had slated a few hours to upgrade this 56 Megabyte monster, but it turned out to be a several-day event. Those that are well-schooled in Linux may find the hairy details useful, and some more background can be found in part one. This project was a stepping-stone to something else, so we’re anxious to see what the end result is.

If you find this interesting, feel free to check out the retro edition of our site. It’s not entirely about ancient computers, but it can hopefully be displayed on one.
via [twitter]
read the rest of article...

Retrotechtacular: Bell Labs introduces a thing called ‘UNIX’

Modern operating systems may seem baroque in their complexity, but nearly every one of them  - except for Windows, natch – are based on the idea of simplicity and modularity. This is the lesson that UNIX taught us, explained perfectly in a little film from Bell Labs in 1982 starring giants of computation, [Dennis Ritchie], [Ken Thompson], [Brian Kernighan], and others.
Retrotechtacular: Bell Labs introduces a thing called ‘UNIX’
At the time this film was made, UNIX had been around for about 10 years. In that time, it had moved far from an OS cloistered in giant mainframes attached to teletypes to slightly smaller minicomputers wired up to video terminals. Yes, smallish computers like the Apple II and the VIC-20 were around by this time, but they were toys compared to the hulking racks inside Bell Labs.
The film explains the core concept of UNIX by demonstrating modularity with a great example by [Brian Kernighan]. He took a short passage from a paper he wrote and found spelling errors by piping his paper though different commands from the shell. First the words in the paper were separated line by line, made lowercase, and sorted alphabetically. All the unique words were extracted from this list, and compared to a dictionary. A spell checker in one line of code, brought to you by the power of UNIX.
read the rest of article...

How the mazes were generated for classic Berzerk game

This is a screenshot from the Atari 5200 version of the classic game Berserk. But the write-up we’re featuring actually looks at the original coin-op version. The maze for each level was established on the fly using a seed number fed into a rudimentary algorithm . Here’s a close look at how the maze building code actually worked.
Recently we saw a talk by Pitfall creator [David Crane] as part of our Retrotechtacular series. That is a real gem of programming history, and one of our favorite take-aways was that the levels were not hardcoded, but built using a random number generator algorithm with a hardcoded seed (so that the game was the same each time you played it). This uses a similar method but with a somewhat random seed.
How the mazes were generated for classic Berzerk game
The maze building was reverse engineered by observing the game in a MAME emulator, and by digging through disassembled code. Each time the code is “cold started” the seed starts out at zero, but from there the room number is used as the next seed. This is fed through a very simple algorithm. It generates directions for the walls, which use s few bit-wise operations to add the pillars inside the rooms.
It’s a great thing to study if you’re writing games for your embedded projects. By generating the room programmatically you don’t use up as much program memory. Of course these days even simple hobby controllers have way more storage to work with than [Alan McNeil] had when he designed Berserk.
read the rest of article...

Leapcast emulates Chromecast in your Chrome browser

Our Chrome browser thinks it’s a Chromecast dongle. Here’s a screenshot of it playing a YouTube video. Note the tile banner and onscreen controls which are just like the ones you’d see on the actual hardware. Give it a try yourself by downloading the Leapcast Python package which [dz0ny] programmed.
Leapcast emulates Chromecast in your Chrome browser
After cloning the GitHub repo we had a few problems compiling the package. Turns out we needed to install python-dev and that took care of it. Starting the daemon is a simple command, we specified our Chrome binary path as well as added a few flags
1
leapcast --name HAD --chrome /usr/bin/google-chrome --fullscreen
Once that was running the Android YouTube app automatically detected Leapcast as a Chromecast device. It gave us a tutorial overlay mentioning the new share icon on the interface. Pressing that icon during playback launched an Incognito window which played the video. [dz0ny] links to a device config JSON file in the README. If you check it out you’ll notice that Netflix is listed as “external” while the others are not. This is because the Chromecast protocol uses a binary for Netflix. The others do it with local websockets or a cloud proxy so they work just fine with this setup.
read the rest of article...

Raspberry Pi Media Center on an Apple TV

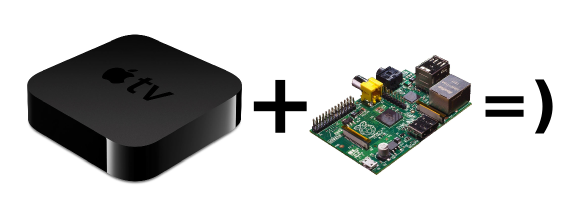
You may tend to think of the AppleTV as a sort of walled garden, and you would mostly be right. Apple keeps tight control over what runs on their devices. That said, [David] decided to look closer at how the various ‘applications’ work. It turns out, the applications are nothing more than glorified web plugins. Using XML and Javascript, the apps simply define library function calls, giving them a consistent interface. So using fairly simply methods, the options really open up. Unfortunately, the method for adding new sites isn’t enabled by default.
Raspberry Pi Media Center on an Apple TV
Using a jailbroken AppleTV, [David] was able to do a fair bit of detective work and found a way to enable the ‘Add Site’ option, which allowed him to use his Raspberry Pi as a media server. The good news: you don’t need to jailbreak if you’re running 5.2 or 5.3… you should be able to recreate his success fairly easily. The bad news: things seem to have changed in 6.0. [David] isn’t sure if this was Apple intentionally closing a hole, or just not dotting all of their i’s.
[David] put all of his research up on Github, including the rough code. If you haven’t updated your AppleTV yet, and you have a Raspberry Pi to use as a media server, give it a try and let us know how it goes in the comments.
read the rest of article...

Creating Irregular Board Outlines in KiCad

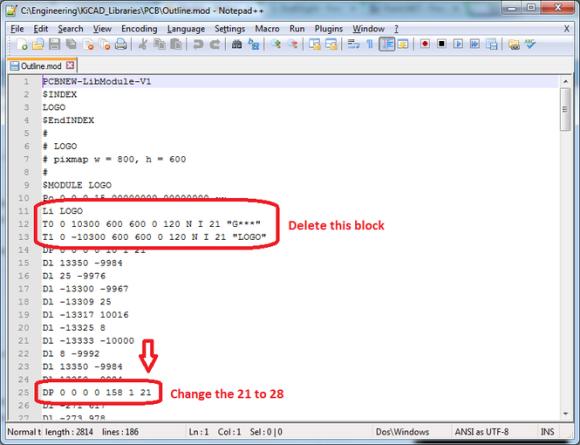
One of the benefits of plain text file format is that you can go in and edit them by hand. This is part of the KiCad board outline hack which [Clint] wrote about in a recent post.He wanted a unique board outline, which is something that KiCad isn’t necessarily well suited for. His solution was to create the outline as an image, then import it. If you’re wondering what custom shape is called for this type of work we’d like to point you to the (kind of) bottle opening HaDuino. That PCB layout was done on Eagle, which has a bit more leeway with special shapes.
Creating Irregular Board Outlines in KiCad
Before getting to the code editing step seen above [Clint] used the built-in feature for KiCad that will turn an image into a component. He exported that code and altered it using a text editor in order to change the layer setting for the shape to that of the board outline. This took him from a plain old image, to a module which can be selected and dropped into the board editing program. It’s a snap to do this sort of thing for the copper layers too if you’re interested in using your mad graphics editing skills to layout an art piece on copper clad.
read the rest of article...