Case Modder Builds LCD Window; Causes LSD Flashbacks

[Chris, aka Mosquito's Mods]  is well-known for some awesome PC case mods. He’s outdone himself this time with an embedded LCD panel as his case window. This use of an LCD is becoming common on arcade games and slot machines. [Chris] was inspired by an arcade game he saw at a local Dave & Buster’s. He started with an off the shelf 16″ USB LCD monitor from AOC.Case Modder Builds LCD Window; Causes LSD Flashbacks

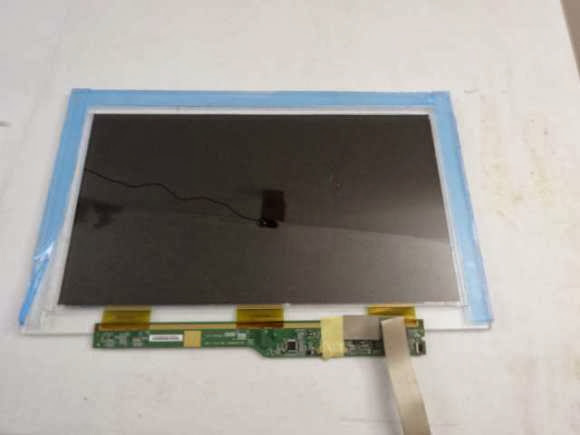
[Chris] then stripped off the back light, diffuser, and reflectors. Left with  the bare panel and polarizers, he then created an LCD sandwich of sorts. First a layer of 2mm acrylic. Then the LCD and panel, along with 4 strips of acrylic forming a frame around the LCD. The frame strips are in blue in the image after the break.
Case Modder Builds LCD Window; Causes LSD Flashbacks
 The final layer is a thick piece of 6mm acrylic. The thick acrylic keeps the window assembly from bending, which would lead to a cracked LCD. The entire assembly is held together with 3M scotch 4010 tape. White LED strips around the LCD shine plenty of light into the case, allowing the images on the LCD to be seen. The final effect is stunning. Images on the LCD appear to be floating in space somewhere behind the window. The effect works best with back and white images, as color is understandably a bit washed out.
read the rest of article...

Re-purposing an Old Laptop Display

[Tim] found himself with a laptop that had a good 18.4″ screen, but otherwise didn’t run properly. It would be a shame to throw that away, so he decided to salvage the screen by turning it into a standalone monitor. This isn’t exactly new, as he did what many people have done and looked to eBay for an after-market LCD controller board.
Re-purposing an Old Laptop Display
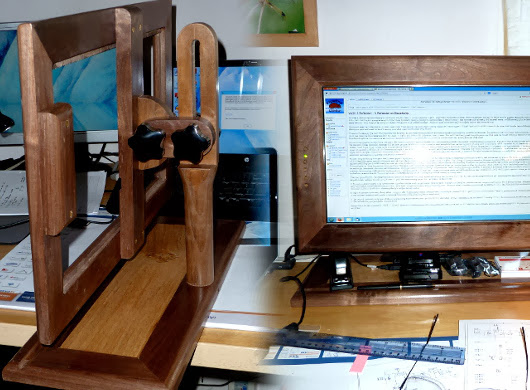
The real beauty is in the enclosure he built. [Tim] had some scrap wood available from a previous project, so he set about designing a new frame for the monitor, and a very nice adjustable stand, as can be seen in the photo above. One nice detail is in the control panel buttons. The LCD controller comes with a separate board housing the controls, and while he made a mistake mounting it initially, he ended up with a nice set of oak buttons that match the frame perfectly.

He then built a nice backing out of styrene that holds the screen in place as well as housing the electronics. Overall, it’s a nice looking project, and it is always nice to see electronics re-purposed rather than ending up in a landfill. We can’t help but think this would be a great frame for building a picture frame or a wall-mounted PC as well.
read the rest of article...

VT100 Gets BeagleBoned

How do you make a great terminal even better?  The answer is simple: add a BeagleBone Black to it! [Brendan] got his hands on one of the staples of classic computing, the DEC VT100 terminal.  The VT100 was produced from 1978 to 1983. The terminal was so widely used that it became the standard for other terminals to emulate. Open any terminal program today and chances are you’ll find a setting for VT100 emulation.
VT100 Gets BeagleBoned
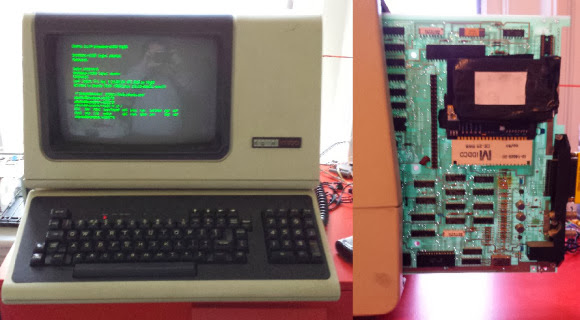
[Brendan] originally hooked his terminal up to a laptop running Linux. The terminal, cables, and the laptop itself became quite a bit to manage on a small desk. To combat this he decided to add a BeagleBone Black inside the terminal case. It turns out the VT100 actually lends itself to this with its Standard Terminal Port (STP) connector. The STP was designed to add a “paddle board” in-line with the serial stream of the terminal. DEC and third party manufacturers used this port to add everything from disk drives to entire CPM computers to the VT100.

[Brendan] began by designing a board to interface between the VT100 and the BeagleBone. The board level shifts serial lines from the BeagleBone to the VT100. The STP also allows the terminal to provide power to the BeagleBone Black.  He did notice some power glitches as the supply of the VT100 came up. This was solved with a standard TI TL77xx voltage supervisor chip. The hardest part of the entire design was the card edge connector for the STP. [Brendan] nailed the dimensions on the first try.In the end [Brendan] was rewarded with a very clean installation that didn’t require any modification to a classic piece of hardware.

We should note that most PCB houses use Electroless Nickel Immersion Gold (ENIG) as their standard coating. This will work for a card edge connector that will be plugged in and removed a few times.  Cards that will be inserted and removed often (such as classic console cartridges) will quickly scrape the ENIG coating off. Electroplated Gold over Nickel is the classically accepted material for card edge connectors, however the process most likely is not going to come cheap in hobbyist quantities.
read the rest of article...