DIY LED Matrix Pong Clock

This neat LED clock mimics the display of the Pong video game to show the time as two paddles play back and forth. The game plays on automatically and updates the time by scoring a point.  It also has a built in menu to change the clock mode and set the time.
DIY LED Matrix Pong Clock
The project is built on 2 green LED matrix panels, an Arduino, and a DS1307 clock chip.  You can complete the entire project for around $100.  The DIYer has made available the project schematics and downloads so you can build your own.

read the rest of article...

Controlling Ten Thousand RGB LEDs

RGB LEDs are awesome – especially the new, fancy ones with the WS2812 RGB LED driver. These LEDs can be individually controlled to display red, green, and blue, but interfacing them with a microcontroller or computer presents a problem: microcontrollers generally don’t have a whole lot of RAM to store an image, and devices with enough memory to do something really cool with these LEDs don’t have a real-time operating system or the ability to do the very precise timing these LEDs require.  [Sprite_tm] thought about this problem and came up with a great solution for controlling a whole lot of these WS2812 LEDs.
Controlling Ten Thousand RGB LEDs
[Sprite] figured there was one device on the current lot of ARM/Linux boards that provides the extremely precise timing required to drive a large array of WS2812 LEDs: the video interface. Even though the video interface on these boards is digital, it’s possible to turn the 16-bit LCD interface on an oLinuXino Nano into something that simply spits out digital values very fast with a consistent timing. Just what a huge array of RGB pixels needs. Using a Linux board to drive RGB pixels using the video output meant [Sprite_tm] needed video output. He’s running the latest Linux kernel, so he didn’t have the drivers to enable the video hardware.

Not a problem for [Sprite], as he can just add a few files to define the 16-bit LCD interface and add the proper display mode. [Sprite_tm] already taken an oscilloscope to his board while simulating 16 strips of 600 LEDs, and was able to get a frame rate of 30 fps. That’s nearly 10,000 LEDs controlled by a single €22/$30USD board. Now the only obstacle for building a huge LED display is actually buying the RGB LED strips. A little back-of-the-envelope math tells us a 640×480 display would be about $50,000 in LEDs alone. Anyone know where we can get these LED strips cheap?

read the rest of article...

POV Display with an Element of Danger

Persistence of vision displays are always cool, although we must admit this one looks like it could very well explode at high speeds… Safety concerns aside, this desk fan based display provides a great starting point for learning about making POV displays. It makes use of an old cellphone battery, an ATmega8, some LEDs, Veroboard, assorted wires and solder and of course, a high-speed desk fan.
POV Display with an Element of Danger
[shparvez001] also provides the full code on his blog for the project, making it very easy to replicate. Though we might also suggest you keep it small enough that the original fan cage still fits on top.
From an aesthetic point of view, the display looks fine in the dark — but when the lights are on you might get some odd looks. We can see this project being greatly improved by mounting the LEDs through one of the fan blades, and the control electronics on the back side of the other blades. Maybe throw in some wireless charging for the battery while the fan is off too?

read the rest of article...

LED Matrix Mask Will Scare Up Holiday Cheer

[Davide] sent us this fun LED matrix mask he built using an ATMega8 and 74LS595N shift registers. Each of the eyes is an 8×8 LED matrix, and the mouth is made from two 8x8s. [Davide] used a ULN2803A Darlington transistor array to drive the matrices.
LED Matrix Mask Will Scare Up Holiday Cheer

When the user steps behind the mask, an IR sensor detects that a face is within range and activates the facial features. The code randomly runs the eye and mouth patterns. If the user starts speaking, a microphone element detects his voice and a separate speaking mouth pattern is executed.
The mask body and stand are découpaged with pages from Dylan Dog comics. [Davide] says he built the mask years ago, but decided to submit it to the 2013 Inverart Art Fair in Milan. As you can probably imagine, the mask has been a big hit with the kids so far. Stick around to see [Davide]‘s Santa-fied demonstration after the jump. [Davide] didn’t give us any details on that sweet hat, unfortunately.
read the rest of article...

Fubarino Contest: A Sculpted Room With LEDs

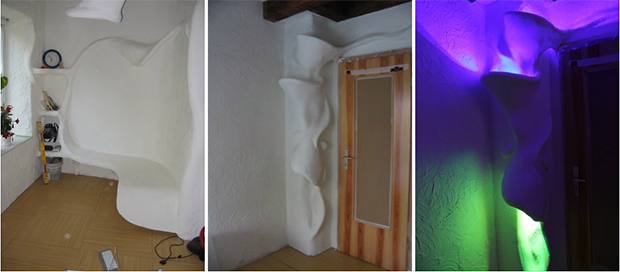
[Sisam] and [Mclien] are a father and son team that built this sculptural room with an organic looking built-in seating area and sculpted lamp shades. When you have a room that looks this cool, the only option you have is to fill it with RGB LEDs, and it just so happens their light controller has a great Hackaday Easter egg.
Fubarino Contest: A Sculpted Room With LEDs
The room lighting is provided by a Shifty VU shield, OctoBar LED controller, and a few of these RGB LED modules. All pretty standard for an RGB LED project, but where this contest submission really shines is the controller for all the room lights. It has three sliders for the red, green, and blue channels, beefy toggle switches for each light location, an LCD for showing the program mode, a rotary switch, and push buttons for cycling through stored setups.
read the rest of article...

Snowden Immortalized as Bond Villain in Edge-Lit Acrylic Poster

[Wilywyrm] needed to come up with a final project for art class that commented on a social issue. Healthcare, schmealthcare, he said, and busted out this movie poster about the NSA spying scandal instead. The circuit uses three extended-duty astable 555 timers to control the brightness of the 5050 RGB common-anode LED strips that run up the sides of the 24″ x 12″ x 1/4″ acrylic panels. Epilog laser engraver and features a different aspect of the poster.
Snowden Immortalized as Bond Villain in Edge-Lit Acrylic Poster
There’s one for Snowden, one for Daniel Craig, and one for the text. Each of the three panels was laser-engraved at 600 DPI on an [Wilywyrm] tied the color channels together in the first panel to output white light. He used red for the second panel and blue for the third. A complete list of parts with build notes is available on his Google Drive. [Wilywyrm]‘s notes include improvement ideas, like making all the RGB strips color-adjustable with more 555s or a microcontroller and timers.

read the rest of article...

Reverse Engineering a Candle Flicker LED

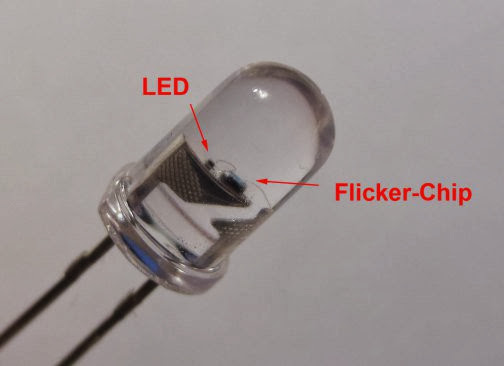
Candle flicker LEDs are a one part replacement for a real candle. They contain both a yellow LED and a control chip that modulates the light to create a candle effect. [Cpldcpu] took a deep look into reverse engineering one of these LEDs.
Reverse Engineering a Candle Flicker LED
To analyze the circuit, which is potted into the LED itself, a shunt sense resistor was connected to the LED. By connecting this resistor to a logic analyzer, the control signal could be observed. This control signal looked like pulse width modulation, with some randomness to the duty cycle. [Cpldcpu] determined that a linear feedback shift register was most likely used to generate a pseudeorandom bitstream, and some shaping was applied to make the LED look more like a real candle.

It turns out a blinking LED can be quite complex, and this takes a deep look into it by analyzing the signal. [Cpldcpu] took the lessons learned and wrote an implementation of the algorithm for AVR.
read the rest of article...

Full LED Snowboarding Suit

Nighttime in the French Alps means the mountains are pitch black and the temperature is a frosty -13°F.  The perfect time of day to go snowboarding, right?  One filmmaker thought so, and created the suit above featuring thousands of white LEDs.  As long as the snowboarder doesn’t fall, I’m sure nothing could possibly go wrong snowboarding at night, right?
Full LED Snowboarding Suit
The idea was formed by a filmmaker who teamed up with an LED expert.  As you can see, the result is pretty neato and he successfully achieved his vision of a lone, illuminated figure moving gracefully across the snow.  Check out the full project details.

read the rest of article...

Controlling High Voltage 7-Segment Displays

The MAX7219 is one of those parts in your bin that has a “done and done” attitude. In case you’re unfamiliar, this chip can be used to control 7-Segment displays, 8×8 Matrix displays, or even a pile of random LEDs. You talk to it via a simple serial interface and it handles the tasks you don’t want to fuss with, such as multiplexing and modulation. Not all displays are alike, however, so [Raj] wrote in to show how he used the MAX7219 to control high voltage 7-segment displays.
Controlling High Voltage 7-Segment Displays

The spec on the MAX7219 only allows an input voltage of 5V, which limits the driver output to around 4V and can cause problems when using large displays that series-connect LEDs internally. [Raj's] solution allows the MAX7219 to control displays with combined forward voltages of up to 24V, and as an added bonus, the circuit maintains compatibility with existing microcontroller libraries. We imagine this could be a nifty trick to keep on hand the next time you need to control large scoreboard displays.

The circuit works with the help of intermediate drivers to essentially level-shift the voltage to the display, which both provides the high voltage and protects the MAX7219’s inputs. One of the drawbacks of this circuit is losing the MAX7219′s constant current feature, requiring that each segment connection includes a current-limiting resistor. We appreciate this design’s attention to default states, because you wouldn’t want all of your LEDs turning ON during boot-up!
read the rest of article...