Once, Twice, Three Times a Nixie

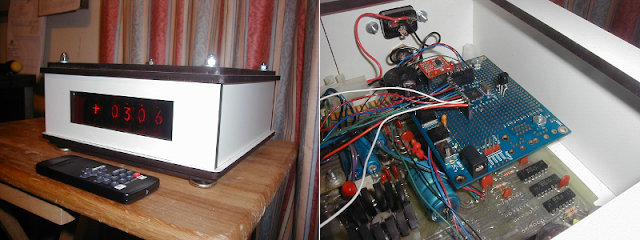
Try as he might, [Localroger] can’t seem to throw away a certain board that started life in one of the first digital industrial scales, the NCI DigiFlex model 5775. He recently gave it a third career as a nixie clock with an alarm.
Once, Twice, Three Times a Nixie
[Localroger] says the board dates to about 1975. It’s all TTL, no microprocessor anywhere. He was headed to the Dumpster with it in the mid-1980s, but realized that he could hack it into something useful. Since the display wasn’t multiplexed, it would be fairly easy. He used it as a BCD tester for about 10 years until the method fell out of fashion.

After a decade on the shelf, [Localroger] started off for the Dumpster once more with the board. The nixie tube display cried out for another chance to glow, so he decided to repurpose it into a remote-controlled bedside clock with an alarm. He installed a Parallax Propeller Protoboard with headers for easy removal and subsequent servicing of the 5775 board.

He added a few things to the protoboard: a piezo element for the alarm, a SparkFun RTC module, an IR receiver, and vertically-oriented header so the PropPlug can be plugged in from the top. But that’s not all. [Localroger] designed a custom melamine-finished MDF enclosure and laser cut it, giving the edges a nice contrast. It’s so tough, he can put his ceramic lamp on top of it to save space on the nightstand.
read the rest of article...

DCF77 Powered Clock is a Work of Art

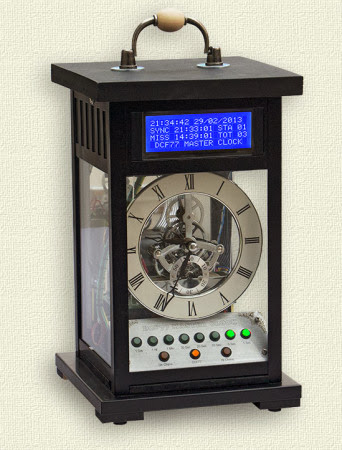
[Brett] just completed his DCF77 Master Bracket Clock, intended to be a backup to an old logic controlled clock he made. For our readers that don’t know, DCF77 is a German longwave time signal whose transmitter is located near Frankfurt (Germany). Every minute, the current date and time are sent on the 77.5kHz carrier signal.
DCF77 Powered Clock is a Work of Art
The result, which you can see above, is made using an Ikea lantern, a skeleton clock, an ATmega328 (for Arduino compatibility), a voice recording playback IC (ISD1730), a cheap 20×4 LCD display, a DCF77 receiver module, and many LEDs. We’re pretty sure that it must have taken [Brett] quite a while to get such a nice looking clock. In case the clock loses power from the power supply, 3 AA cells provide battery backup. On the firmware side, making the platform Arduino-compatible allowed [Brett] to use its libraries so the coding was quickly done. Embedded after a break is a video of the final result.
read the rest of article...

How Much Can You Cram Into a Wristwatch

Creating wearable electronics that are functional and not overly bulky is very, very hard. [Zak], though, makes it look easy. He started his DIY digital wrist watch to see how much he could cram into a watch-sized device. The finished product is really incredible, and one of the most amazing DIY watches we’ve ever seen.
The electronics for the watch include an ATMega328p, a DS3231M Real Time Clock, a Microchip battery charger, and a few resistors and caps.
How Much Can You Cram Into a Wristwatch
The display is an OLED, 1.3″ wide and only 1.5 mm thick, contributing to the crazy 10mm overall thickness of the watch. The software is where this watch really shines. Along with the standard time and date functions, [Zak] included everything and more a wrist watch should have. There is an interface to set up to ten alarms on different days of the week, a Breakout and ‘Car Dodge’ game, a flashlight with integrated ‘rave’ mode, and a stopwatch. On top of this, [Zak] included some great animations very similar to the CRT-like animations found in Android.


It’s a fabulous piece of kit, and if any project were deserving of being made into an actual product, this is it.
You can check out [Zak]‘s demo of all the functions of his watch below.
read the rest of article...

Making an UNIX Clock While Making a Few Mistakes Along the Way

Sometimes the projects we think are easy to design are the ones on which we end up making the most mistakes. The UNIX clock that you see in the picture above is one of these projects. For our readers that don’t know it, UNIX time is the number of seconds since 00:00 on January 1st 1970. The clock that [James] designed is based on an Arduino Pro Mini board, an RTC chip to store the time, a custom made display board and two buttons to set the date/time.
Making an UNIX Clock While Making a Few Mistakes Along the Way
One of the mistakes that [James] made was designing the boards on which will be soldered the seven-segment displays before actually choosing the ones he’ll use, as he was thinking they’d be all the same. The displays he ended up with had a different pitch and needed a different anode voltage, so he had to cut several traces on the PCBs and add another power supply. It also took [James] quite a while to remove the bits that his hackerspace’s laser didn’t cut through. We strongly advise a good look at his very detailed write-up if you are starting in the electronics world.
read the rest of article...

Arduino Astronomic Clock Automates Lights

[Paulo's] garden lights are probably a bit more accurately automated than anyone else’s on the block, because they use latitude and longitude clock to decide when to flip the switch. Most commercial options (and hobbiest creations) rely on mechanical on/off timers that click on an off every day at the same time, or they use a photosensitive element to decide it’s dark enough.
Arduino Astronomic Clock Automates Lights
Neither is very accurate. One misplaced leaf obscuring your light-dependent resistor can turn things on unnecessarily, and considering the actual time of sunset fluctuates over the year, mechanical switches require constant adjustment.

[Paulo's] solution addresses all of these problems by instead relying on an algorithm to calculate both sunrise and sunset times, explained here, combined with swiftek’s Timelord library for the Arduino. The build features 4 7-segment displays that cycle through indicating the current time, time of sunset and of sunrise.

Inside is a RTC (real time clock) with battery backup for timekeeping along with an Omron 5V relay to drive the garden lamps themselves. This particular relay comes with a switch that can force the lights on, just in case.
read the rest of article...

The Greenest Wall-Powered Clock

Some of the most inefficient appliances in the home are AC mains-powered clocks. You can’t exactly turn them off and they use a whole lot of energy considering how often they’re looked at. [t3andy] came up with a great low power AC Mains clock that is only on 3% of the time. As a neat bonus, it also looks really, really cool.
The Greenest Wall-Powered Clock
[t3andy] is using a Teensy 3 as the brains of this clock, and the serial interface on the board provides a relatively easy means of setting the time without having to use buttons or tact switches. The clock face consists of 13 neopixels, with two red pixels showing the hour and a single green pixel showing the minutes. The time is measured with a DS3232 I2C real time clock with a battery backup.
The design is remarkably efficient since the LEDs are off 97% of the time, only being lit at the top of the minute. There are provisions for IR control and a PIR sensor to display the time whenever it’s needed, but that would obviously mean a hit to the energy efficiency.
read the rest of article...

Game of Life Clock

[Alex] wanted to make an LED clock. But simply making an LED array clock was far too easy — so he decided to make it follow some interesting rules…
Ever heard of John Conway’s Game of Life? It’s quite simple — there are four rules.
Game of Life Clock
  1. Any live cell with fewer than two live neighbours dies, as if caused by under-population.
  2. Any live cell with two or three live neighbours lives on to the next generation.
  3. Any live cell with more than three live neighbours dies, as if by overcrowding.
  4. Any dead cell with exactly three live neighbours becomes a live cell, as if by reproduction.
    [from Wikipedia]
So [Alex] decided to make his clock LED matrix follow these rules, with lit pixels representing life. Every minute, on the minute, the time is displayed. But as soon as it is displayed, the rules take over, and the display disintegrates, following the rules of the Game of Life. It makes for an very interesting display that’s just waiting to be scaled up to a larger size!
He’s done a great job writing it up on his blog, and has included his code as well — so if you’re so inclined, take a look! If not, stick around after the break to see the clock in action.
read the rest of article...

An Overly-Complicated Logic Chip Clock

When a normal alarm clock just won’t do, the only option is to build your own, entirely out of discrete logic chips. [jvok] built this alarm clock for last year’s 7400 Logic Competition. In a desire to go against the grain a little bit, [jvok] decided to use 4000-series logic chips. It was allowed under the rules, and the result is a wonderful example of what can be done without a microcontroller.
An Overly-Complicated Logic Chip Clock
Most clock projects we’ve seen use a single button to increase each digit. [jvok] wanted to do something unique, so he is able to set his clock with a ‘mode’ button that allows him to independently set the hours, minutes, and seconds. He’s only ever seen this method of setting a clock’s time used with microcontroller-based projects, and translating even that simple code into pure circuitry is quite impressive.
This clock also includes an alarm function, set by a bunch of DIP switches in binary coded decimal. It’s a great piece of work, and deserving of much more attention than it received during the Open Logic Competition.
read the rest of article...

Heathkit Clock Updated With a PIC32 and GPS

One of [Bob's] most treasured possessions is a Heathkit alarm clock he put together as a kid. Over the years he’s noticed a few problems with his clock. There isn’t a battery backup, so it resets when the power goes out. Setting the time and alarm is also a forward only affair – so stepping the clock back an hour for daylight savings time means holding down the buttons while the clock scrolls through 23 hours. [Bob] decided to modify his clock with a few modern parts. While the easiest method may have been to gut the clock, that wouldn’t preserve all those classic Heathkit parts. What [Bob] did in essence is to add a PIC32 co-processor to the system.
Heathkit Clock Updated with a PIC32 and GPS
Like many clocks in the 70′s and 80′s, the Heathkit alarm clock was based upon the National Semiconductor MM5316 Digital Alarm Clock chip. The MM5316 operates at 8 – 22 volts, so it couldn’t directly interface with the 3.3V (5V tolerant)  PIC32 I/O pins. On PIC’s the input side, [Bob] used a couple of analog multiplexer chips. The PIC can scan the individual elements of the clock’s display. On the PIC’s output side, he used a couple of analog switches to control the ‘Fast’, ‘Slow’, and ‘Display Alarm/Time’ buttons.


The PIC can now read and change the clock’s time and alarm. By pressing all three buttons together, it can reset to a known state of Midnight. The only thing missing was a real time data source. [Bob] added a GPS to the system to accomplish this. The GPS receives the current GMT time from satellites and sends that data to the PIC. The PIC then offsets this by a timezone value stored in NVRAM. Alarm time is also stored in NVRAM.
At power up the PIC first sets the clock’s alarm. Then it waits for the GPS to sync. Once it has GPS time, the PIC sets the clock. The PIC also resets the clock time every night at midnight. The MM5316 is still in control of keeping time hour to hour. This is a great hack, and a really nice way of adding functionality to a classic clock with a beautiful VFD display.
read the rest of article...

Fire Bell Wakes you for Work by Shaving Years off your Life

If you suck at getting up in the morning [Jake Lee] has a solution that will make sure you don’t get fired from your job. Unfortunately it’s going to scare the life out of you — but maybe we’re just not hard enough sleepers to appreciate the value in an alarm clock that’s so horribly loud.
Fire bell wakes you for work by shaving years off your life
At first we wondered where he got the bell but it looks like you can buy one for about fifteen bucks. We’re not saying you should hide one of these under your best friend’s bed, but the cost of the bell does put it firmly in the worth-it-as-a-prank price range. [Jake] used rigid and flexible conduit to connect the bell to a power source, and the control panel shown on the left. He uses the LED backlight of the bedside alarm clock to drive the base of a transistor, switching a relay to trigger the bell. The big button on the grey box makes the wailing stop (seriously, cut your volume before you hit 0:30 in the clip below).
read the rest of article...