Homemade Polariscope is Super Easy to Make

[Abhimanyu Kumar] was watching YouTube videos one day when he came across something called a Polariscope — After learning how it worked, he discovered you can make your own using household items!
First off, what is a Polariscope? Well, put simply, it is a device that can show you the photoelasticity of a clear specimen, which can reveal the stress distribution in the material! And it is actually really easy to make one.
Homemade Polariscope is Super Easy to Make
All you need to build your own is:
  • A polarized light source (any modern LCD monitor)
  • A transparent specimen (plastic cutlery, glass statues, plastic you can bend, etc)
  • A circular polarizing filter (the cheap 3D glasses you didn’t return at the theater)
Then just place the objects in the order shown in the diagram and start snapping some photos. This would be really cool for checking stress concentrations in a project — provided you are using some Lexan or acrylic!
read the rest of article...

Retro Chaser Sign Lights Up Your Life

[Gnsart] builds props often used in the film industry. He’s created an amazing retro Vegas style light chaser sign. The sign was started as a job a few years ago. While [Gnsart] could handle the physical assembly, the cost of a mechanical light chaser pushed the project over budget. The sign project was cancelled back then, but he never forgot it.
Retro Chaser Sign Lights Up Your Life
Fast forward to a few weeks ago. [Gnsart] happened upon the Arduino community. He realized that with an Arduino Uno and a commonly available relay board, he could finally build the sign. He started with some leftover cedar fence pickets. The pickets were glued up and then cut into an arrow shape. The holes for the lights were then laid out and drilled with a paddle bit. [Gnsart] wanted the wood to look a bit aged, so he created an ebonizing stain. 0000 steel wool, submerged and allowed to rust in vinegar for a few days, created a liquid which was perfect for the task. The solution is brushed on and removed just like stain, resulting in an aged wood. We’ve seen this technique used before with tea, stain, and other materials to achieve the desired effect.

[Gnsart] then built his edging. 22 gauge steel sheet metal was bent to fit the outline in a bending brake. The steel sheet was stapled to the wood, then spot welded to create one continuous piece. Finally, the light sockets were installed and wired up to the Arduino. [Gnsart] first experimented with mechanical relays, and while we love the sound, we’re not sure how long they’d last. He wisely decided to go with solid state relays for the final implementation. The result speaks for itself. LEDs are great – but there is just something about the warm glow of low-wattage incandescent lights.


read the rest of article...

3D Acoustic Manipulation: Seeminly-Unreal Levitation Using Soundwaves

Wow. [Yoichi Ochiai], [Takayuki Hoshi] and [Jun Rekimoto] are researchers from the University of Tokyo and the Nagoya Institute of Technology, and they have just learned how to airbend. Using a series of standing ultrasound waves, it is possible to suspend small particles at the sound pressure nodes. The acoustic axis of the ultrasound beam is parallel to gravity, which also allows the objects to be manipulated along the fixed axis by varying the phase or frequencies of the sound.
3D Acoustic Manipulation: Seeminly-Unreal Levitation Using Soundwaves
By adding a second ultrasound beam perpendicular to the first it is possible to localize the pressure node, or focal point, and levitate small objects around a 2D plane.In their demonstrations they float foam particles, a resistor, an LED, they show off the waves using a piece of dry ice, and even manage to float a small screw.
Sound like crazy talk? Just watch the video.


Want to build your own? We covered a much more simple DIY Acoustic Levitator rig a few months ago.
[via Hardware-360]
read the rest of article...

Once, Twice, Three Times a Nixie

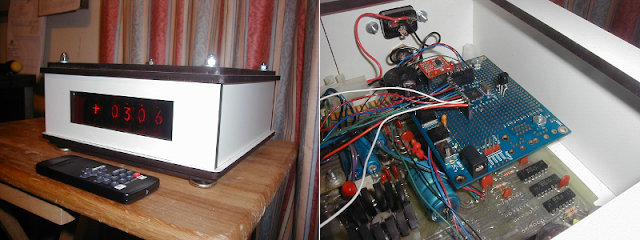
Try as he might, [Localroger] can’t seem to throw away a certain board that started life in one of the first digital industrial scales, the NCI DigiFlex model 5775. He recently gave it a third career as a nixie clock with an alarm.
Once, Twice, Three Times a Nixie
[Localroger] says the board dates to about 1975. It’s all TTL, no microprocessor anywhere. He was headed to the Dumpster with it in the mid-1980s, but realized that he could hack it into something useful. Since the display wasn’t multiplexed, it would be fairly easy. He used it as a BCD tester for about 10 years until the method fell out of fashion.

After a decade on the shelf, [Localroger] started off for the Dumpster once more with the board. The nixie tube display cried out for another chance to glow, so he decided to repurpose it into a remote-controlled bedside clock with an alarm. He installed a Parallax Propeller Protoboard with headers for easy removal and subsequent servicing of the 5775 board.

He added a few things to the protoboard: a piezo element for the alarm, a SparkFun RTC module, an IR receiver, and vertically-oriented header so the PropPlug can be plugged in from the top. But that’s not all. [Localroger] designed a custom melamine-finished MDF enclosure and laser cut it, giving the edges a nice contrast. It’s so tough, he can put his ceramic lamp on top of it to save space on the nightstand.
read the rest of article...

I am NXT 3-Point Bend Tester. Please Insert Girder.

Learning with visuals can be very helpful.  Learning with models made from NXT Mindstorms is just plain awesome, as [Rdsprm] demonstrates with this LEGO NXT 3-point bend tester that he built to introduce freshmen to flexural deflection and material properties. Specifically, it calculates Young’s modulus using the applied force of a spring and the beam’s deflection. [Rdsprm] provides a thorough explanation in the About section of the YouTube video linked above, but the reddit comments are definitely a value-add.
I am NXT 3-Point Bend Tester. Please Insert Girder.
[Rdsprm] built this from the Mindstorms education base set (9797) and the education resource set (9648). Each contestant endures a 5-test battery and should produce the same result each time. The motor in the foreground sets the testing length of the beam, and the second motor pulls the spring down using a gearbox and chain. This method of deflection testing is unconventional, as [Rdsprm] explains. Usually, the beam is loaded incrementally, with deflection measured at each loading state.

Here, the beam is loaded continuously. Vertical deflection is measured with a light sensor that reads a bar code scale on the beam as it passes by. The spring position is calculated and used to determine the applied force. [Rdsprm] analysed the fluctuation in GNU Octave and has graphs of the light sensor readings and force-deflection.

read the rest of article...

NeverWet on Electronics?

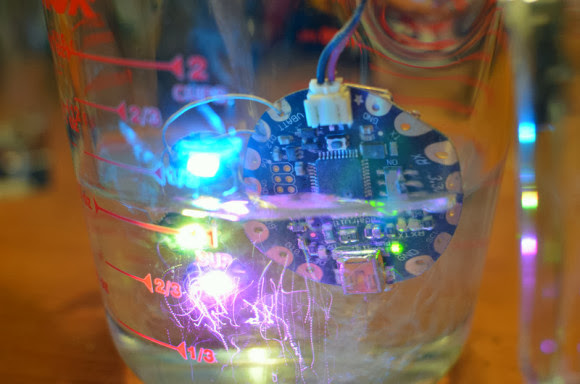
Does NeverWet work on electronics? The team over at Adafruit just had to find out — and to an extent, it does work! But wait, what’s NeverWet? It’s Rust-Oleum’s miracle water-repelling coating which is super hydrophobic. It actually works, and we’re kind of surprised we haven’t seen it used in a hack yet! Anyway, let’s start this hack with a quick disclaimer. NeverWet is not designed for waterproofing electronics.
NeverWet on Electronics?
But when has that ever stopped the pursuit of science!?

The experimenters chose a few electronic guinea pigs to test out NeverWet’s capabilities. An Arduino Micro, a FLORA LED broach, and a Raspberry Pi. Using the proper application method they coated the unlucky electronics with a few generous layers of the product. Using plain NYC tap water they tested each component. The FLORA LED broach (shown above) lasted underwater for about 4 hours before it died. The Arduino Micro fared similar, however the Wet Raspberry only booted once before losing connection to the SD card. For full details check out the full experiment or stick around after the break to see a video of the tests.
read the rest of article...