DIY Dazzling Laser Light Party Ball

Here’s a challenge for you: stuff over a dozen red lasers and a rechargeable lithium ion battery inside a tennis ball.  Oh, and also a microcontroller and infrared port to control patterns from afar.
DIY Dazzling Laser Light Party Ball
To make your own, the author has constructed a high quality tutorial so you can build your own party ball. You’ll need a soldering iron, a Dremel/rotary tool, wire cutters, and a few other craft items.

read the rest of article...

DIY Star Trek Automatic Door

Who hasn’t dreamed of have a Star Trek style automatic door in their home (complete with “wooshing” noise)? Now you can build your own with the help of this DIY project and some pneumatics. The pnematic system uses an air compressor, a piston, valves, hoses, infrared sensors, and an Arduino.
DIY Star Trek Automatic Door
The best part about the pneumatics is that the “woosh” noise comes built in – No special effects department needed!  Check out more details about the door.

read the rest of article...

The Flow Of Time Draws On A River

You would think Hackaday would see more projects from public art exhibitions. They really do have everything – the possibility to mount electronics to just about anything in a way that performs interesting but an ultimately useless function. So far, though, [Richard Schwartz's] Flow of Time is on the top of a very short list of public art installations we like.
The Flow Of Time Draws On A River
The idea behind the build is a German phrase that means something similar to ‘time trickles away’. [Richard]‘s project implements this by printing the current time onto the surface of a flowing river in [Richard]‘s native Innsbruck.
The build uses five micro piezo pumps to dispense food coloring from a bridge. Every minute, an Arduino pumps this food coloring in a 5×7 pixel digit to ‘write’ the time onto the surface of a river. Surprisingly, [Richard]‘s installation doesn’t require much upkeep. The pumps only use about 70ml of food coloring a day, and the entire device – including the Raspi WiFi webcam – is solar powered with a battery backup.
You can see a video of the time printing on a river below.


read the rest of article...

Turning A Storefront Into A Video Game

[Kris]‘ house/office has a huge store window, and instead of covering it up with newspapers, decided to do something cool. He’s had projections and other art pieces on display for his neighbors, but his new storefront arcade game very likely beats all of those.
Turning A Storefront Into A Video Game
Every video game needs a display, and this one is no slouch. The display is a 16*90 matrix of WS2812 LEDs with inset into a laser cut grid and put behind a layer of plexiglass. With this grid, the display has a great raster effect that’s great for the pixeley aesthetic [Kris] was going for. In front of the window is an MDF and steel arcade box powered by an Arduino Due.

The game is driven by the Adafruit neopixel library, with a few modifications to support alpha blending. There’s no external memory for this game – everything is running on a second Arduino Due inside the window. It’s a great looking game, and if you’re ever in [Kris]‘ area – behind the zoo in Antwerp – you’re free to walk up and give this game a spin

Video demo below.

read the rest of article...

Something WiFi This Way Comes; Wicked Device Unveils Wildfire

Wicked Device has released the WildFire board to the world. WildFire is a an Arduino compatible processor board with a Texas instruments CC3000. WildFire adds a few interesting features to the typical ‘Duino clone. Instead of the ATMega328 used in the Arduino Uno, the WildFire uses an ATMega1284p, which gives 16K of SRAM and 128K of Flash ROM (as compared to 2K RAM and 32K Flash in an Uno). A micro SD card slot is also on-board for data logging functions.
Something WiFi This Way Comes; Wicked Device Unveils Wildfire
In the name of full disclosure, we should mention that [Adam] has known [Victor and Ken] over at Wicked Device for a few years now, and got his hands on a pre-release version of the board to play with. As with any non-standard Arduino board, the WildFire does require some modification to the Arduino IDE. This took a bit of time with the pre-release board.

Wicked Device has streamlined the process since then. Everything is contained in a zip file on their product page. Once the IDE is up and running, its easy to get the WildFire’s CC3000 connected to your local access point. From there the internet is your playground. For those of you already asking “So, Hack?”, watch this space – Adam is working on a hack using the WildFire board which will show up in a few days.
read the rest of article...

Running a Laundromat with an Arduino

[Hubert] sent us a tip about a friend’s project to rescue a laundromat from its failing electronics. We’re not entirely sure what went wrong with the old control center, but considering a replacement would have cost nearly 25,000 EUR, we think [Stefan] found the perfect solution: he gave it an Arduino and Android overhaul (translated).
Running a Laundromat with an Arduino
Although [Stefan] explains that the boards were defective, perhaps one of our German readers can help us out with a more specific translation. More clear, however, are the steps taken to upgrade the system. The situation at the laundromat was a bit of an emergency:

there was no way for customers to pay for use of the machines. As a result, [Stefan] had free reign to overhaul things as he saw fit. He decided to remove the complex button setup in favor of a touchscreen Android tablet, which provided users with a simple interface to make selections. The tablet serves only as an input device. The heavy lifting is handled by an Arduino Mega 2560, which hooks up to what remains of the original system and controls the 27 machines in the laundromat.

[Stefan] admits that he isn’t a particular fan of the Arduino, but that for the price, it’s a tough solution to beat. He’s not the only one overhauling with Arduinos.
read the rest of article...

Epic DIY Replica of Disneyland’s Electrical Light Parade

Every night at Disneyland, an Electrical Light Parade illuminates the darkness by featuring vehicles draped in a fantastic array of multicolored lights.
Epic DIY Replica of Disneyland’s Electrical Light Parade
One enthusiastic fan (who had already created a mini replica of Disney’s Main Street) created a replica of the famous light parade using dozens of RGB LEDs.  The result is a stunny array of craftsmanship.  Check out how the entire system was created:

read the rest of article...

Epic Doomsday Device Build

Inspired by science fiction movies, this DIYer created a doomsday device prop complete with pull-pin, epic LED lighting, and countdown timer.  When his microwave broke, he salvaged its innards to build this device.  Overall, this project is a great way to improve your electrical, mechanical, and creative design skills.
Epic Doomsday Device Build
Inside the device is an Arduino which coordinates the communication between the push buttons, clock timer and lighting effects.  The bulky mass of electronics seen at the bottom of the device are high power hardware from the guts of the microwave.
Epic Doomsday Device Build
Additionally, an old garden light was used for the “core” of the device and ancient tape recorder buttons were resurrected for pushbuttons.  When you’re ready to build your own apocalypse device (or perhaps just an epic looking alarm clock), check out the project guide to get started.

read the rest of article...

How to: Super Simple Self-Balancing Robot Tutorial

Since the introduction of the segway, DIYers have been building their own self-balancing transportation devices.  Before you go off and build a full-size version, here’s a simple project to help you learn the basics of control system design (the software which powers the balancing act).  Essentially, a microcontroller reads sensors such as gyroscopes and accelerometers, then uses a PID algorithm to make minute adjustments to the robot’s wheels.
How to: Super Simple Self-Balancing Robot Tutorial
The little robot featured above is powered by an Arduino Nano and remotely controlled via bluetooth.  Additionally, the device features three potentiometers to fine tune the balancing algorithm.  Both the wheels and body were 3D printed.  To learn how to build your own minature self-balancing robot, check out the full project details and be sure to check out these three epic self-balancing posts:

read the rest of article...

1Sheeld Uses Your SmartPhone as an Arduino Accessory

The Arduino can be a bit of a gateway board. You start with an Uno, then a shield, then another. Before you know it, you have an entire collection of shields. This is the problem 1Sheeld wants to solve. 1Sheeld allows a you to use your cell phone as a sensor and I/O suite for your Arduino, replacing many existing shields. We think this will be a great idea, especially with all the older phones coming off contract these days.
1Sheeld Uses Your SmartPhone as an Arduino Accessory
The sensor capabilities of the average smartphone, as well as the LCD and touchscreen I/O capabilities could make for an interesting pairing.

Currently the 1Sheeld page is just a sign up for an upcoming kickstarter, which leaves many details to the imagination. It appears that the 1Sheeld will be a bluetooth based board. A few questions do remain to be answered though – will the 1Sheeld use the Android ADK? The software is what we’re waiting to see.

The software running in the 1Sheeld module bluetooth chip will be important, but the software running phone side will be the real make or break of this module. We would love to see more smartphones being used for hardware hacking rather than collecting dust once they’ve been replaced.
[Via TechCrunch]
read the rest of article...

LED Magic Staff Just in Time for Halloween!

[Dave's] been working pretty hard on his Arduino driven, LED-lit, magical staff for the past few months, and now it’s finally coming together.
LED Magic Staff Just in Time for Halloween!

He’s using 6 LED strips that contain 55 LEDs each — at full brightness the staff can suck up an impressive 20A @ 5V! To power it, he’s equipped the staff with 8 NiMH C size batteries (5000mAh @ 1.5V). This works out to about 15-20 minutes of runtime at full power (255, 255, 255, LED values) — to counter this he usually runs a sparkly LED algorithm that lasts much longer. Besides, at full power it’s really quite blinding.

The staff is controlled by an Arduino Uno and currently only has two different modes: random and full brightness. Not to worry though, he’s planning on adding a sound sensor to turn it into an equalizer, a shock sensor to give it a cool ripple effect while walking, and maybe a few other interesting patterns!
Stick around after the break to see the first test video!

read the rest of article...

Arduino Keypad Door Automation

[Andrea] just sent us this great student hack he made for his room. He’s constructed an Arduino keypad door lock – without using any proper fastening hardware!
Arduino Keypad Door Automation
The entire build is made out of scrap parts he had lying around: some DVD’s, a bit of wood, an allen key, a motor and belt from a broken printer, an old hard drive enclosure, and a few power supplies. As you can see the entire setup is held up rather artistically using good old duct tape.

The system auto-locks after 5 seconds, and just in case, [Andrea] has hard-coded in a few safety codes into the firmware to allow him to forcefully open the door — you know, if it malfunctions or something.

Not overly confident in his code, he also has it reset every 5 minutes of idling to safeguard against potential memory leaks — probably a good idea! All in all it’s a very cool build, and we have to give him props for not damaging the door to mount it! Down the road he’s also planning on adding a knock sensor using the small speaker that is already part of the circuit, because, why not?
Stick around after the break to see this magnificent contraption that would make Red Green proud.

read the rest of article...

Plotterbot Hangs on your Wall to Work

Looking for a fun and easy to do project to begin your foray into the fun-filled world of Arduinos? How about your very own drawing robot, aptly named, the Plotterbot!
Plotterbot Hangs on your Wall to Work

We first heard word of this project when [Jay] submitted a giant plotted version of the Hack A Day logo for our Trinket contest, and we liked the Plotterbot so much we had to give it a featured article!

It’s a very simple design that uses an Arduino, 2 stepper motors, a servo motor (for pen lifting), some fishing line and various odds and ends you can probably find around the house. Realistically it will cost around $100 to build, but if you can salvage some parts from an old printer or scanner, even less!

[Jay] is currently releasing a series of detailed posts on his blog explaining the process of building one, but if you’re excited to start right away, you can always check out his FAQ for more juicy details.
read the rest of article...

Freeside’s Infinity Portal

If infinity mirrors aren’t cool enough, the 10-foot-tall infinity portal should blow you away. Strictly speaking, the mirror itself is only 7′x4′, but you’ll still find yourself engulfed in the archway. The portal began as a simple prototype that we covered earlier this summer, which was just a frame of 2×4′s, some acrylic and LED strips. It works by putting lights between a two-way mirror and another mirror, reflecting most light internally and creating the illusion of depth.
Freeside’s Infinity Portal
The giant archway also began as a small-scale prototype, its shape and engravings carved out by a laser cutter. Once they were satisfied with its design, it was time to scale things up. The full-sized portal needed a a tremendous amount of stability, so the guys at Freeside built the base from wooden palettes.

They needed the portal to travel to a few different venues, so the rest of the frame breaks down into components, including a removable wooden frame from which the acrylic hangs. A Teensy 3.0 runs all the WS2812 LED strips, which were chosen because each of their LEDs is individually addressable.
Check out the video below for an extremely detailed build log, which should give you a better idea of how massive and impressive this portal really is!
read the rest of article...

Commodore 64 Power Glove Is So Bad

The Nintendo Power Glove was terrible. Really, really terrible. Thanks to modern components, though, it’s possible to recreate the Power Glove experience in a way that doesn’t suck so much. That’s what [Leif] did with his motion sensing glove for the Commodore 64.
Commodore 64 Power Glove Is So Bad
Instead of rolling his own IMU and putting it in a glove, [Leif] is using SonicWear SoMo, a glove originally designed to generate MIDI data for performance pieces. Inside this glove is a 9 DOF gyro/accelerometer/magnetometer, uC, battery, and XBee that can be easily reprogrammed to do something a little more (or less) useful than simply sending MIDI notes and commands.

[Leif] reprogrammed the XBees to use I/O line passing instead of sending serial data, and connected the recieving XBee to the C64 joystick port through a very simple circuit with a hex inverter.
All the code to turn a SonicWear glove into a C64 controller is available on the Github, and there’s a neat demo video of [Leif] demoing his glove at the VCF Midwest late last month.
read the rest of article...

Automated Aquarium is Kitchen-Sinky

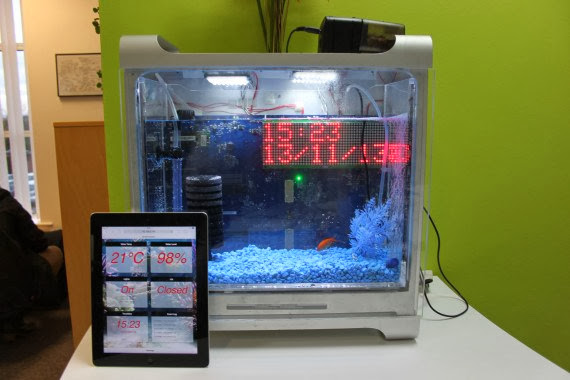
People have been converting their old Power Macs and Mac G5s into fish tanks for a few years now, but [Hayden's] Internet-enabled tank is probably the most awesome ever crammed into an aquarium along with the water and the fish—and we’ve seen some fascinating builds this summer.
Automated Aquarium is Kitchen-Sinky
After gutting the G5 and covering the basic acrylic work, [Hayden] started piling on the electronics: a webcam, timed LED lighting, an LCD for status readouts, filter and bubble control via a servo, an ultrasonic sensor to measure water levels, thermometer, scrolling matrix display, an automatic feeding mechanism, and more. He even snuck in the G5′s old mainboard solely for a cool backdrop.


The build uses both a Raspberry Pi and an Arduino Mega, which sit underneath the tank at the base. The Pi provides a web interface written in PHP and jQuery, which presents you with the tank’s status and allows changes to some settings.

Nearly every component received some form of modification. [Hayden] stripped the webcam of its case and replaced the enclosure with a piece of acrylic and a mountain of silicone, making it both waterproof and slim enough to fit in the appropriate spot. Though he decided to stick with an Amazon-bought Eheim fish feeder, he disabled the unit’s autofeed timer and tapped in to the manual “feed” button to integrate it into his own system.

It’d take half of the front page to explain the rest of this thing. We’ve decided to let the aquarium tell you the rest of its features in the video below. Yeah…it can talk.
read the rest of article...

Arduino-Based Power Failure Alert System

When the power went out at his parents’ shop and ruined the contents of their fridge, [Lauters Mehdi] got to work building a custom power failure alert system to prevent future disasters. Although some commercial products address this problem, [Lauters] decided that he could build his own for the same cost while integrating a specific alert feature: one that fires off an SMS to predefined contacts upon mains power failure.
Arduino-Based Power Failure Alert System
The first step was to enable communication between an Arduino Micro and a Nokia cell phone. His Nokia 3310 uses FBus protocol, but [Lauters] couldn’t find an Arduino library to make the job easier. Instead, he prototyped basic communication by running an Arduino Uno as a simple serial repeater to issue commands from the computer directly to the phone, and eventually worked out how to send an SMS from the ‘duino.

[Lauters] then took the phone apart and tapped into the power button to control on/off states. He also disconnected the phone’s battery and plugged it into an attached PCB. The system operates off mains power but swaps to a 1000mAH 9V backup battery during a power outage, logging the time and sending out the SMS alerts. A second message informs the contacts when power has been restored.
Head over to [Lauters's] project blog for schematics and photos, then see his GitHub for the source code.
read the rest of article...

DIY Bluetooth Home Automation

Interested in a bit of home automation? Don’t know where to start? We just found a great Instructable on making your own bluetooth controlled relay module!
DIY Bluetooth Home Automation
[Kyle's] been working on this for a while, and finally at his 5th iteration he’s ready to share it with the public. It’s a project you can make from scratch, and each unit will cost approximately ~$25 in components — which can control up to two outputs.

He’s included an inkscape PCB layout which you can easily etch on your own using the toner transfer method. The heart of the build is an Atmega328, which helps keep the costs down — after all, it is only controlling two outputs! Then it’s just a matter of adding the components, a bit of soldering, and uploading the firmware! 

The entire design is open source, and [Kyle] would love some feedback to continue improving upon it. The write-up is quite thorough, so if you’re interested, take a look and leave him a comment!
read the rest of article...

Hacking a Cheap Toy Quadcopter to work with Arduino

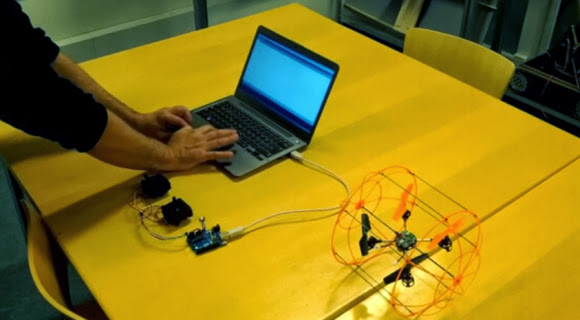
Building your own quadcopter is an expensive and delicate ordeal. Only after you navigate a slew of different project builds do you feel confident enough to start buying parts, and the investment may not be worth your effort if your goal is to jump right into some hacking. Fortunately, [Dzl] has a shortcut for us; he reverse engineered the communication protocol for a cheap toy quadcopter to work with an Arduino.
Hacking a Cheap Toy Quadcopter to work with Arduino
The cheap toy in question is this one from Hobbyking, which you can see flying around in their product demonstration video. [Dzl] cracked open the accompanying control handset to discover which transceiver it used, then found the relevant datasheet and worked out all the pin configuration involved in the SPI communication. Flying data is transmitted as 8 byte packets sent every 20 mS, controlling the throttle, yaw, pitch and roll.


[Dzl] took the build a step further, writing an Arduino library (direct Dropbox download link) that should catch you up to speed and allow you to skip straight to the fun part: hacking and experimenting! See his quick video after the break, then convince yourself you need a quadcopter by watching this one save its creator, [Paul], the trouble of walking his son to the bus stop.
read the rest of article...