Modifying the HC-05 Bluetooth Module Defaults Using AT Commands

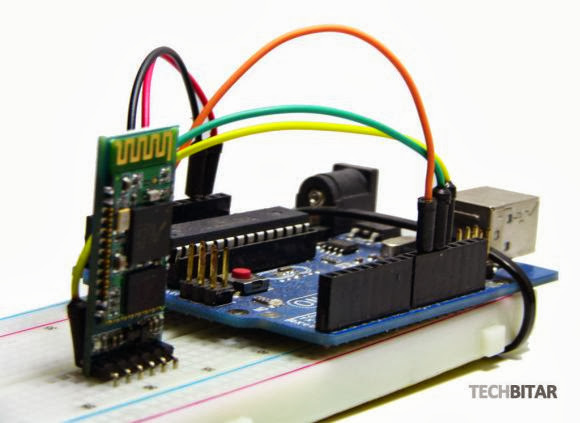
The HC-05, a Bluetooth to serial bridge, can be found for around $5 on the internet and therefore may be the cheapest way to add Bluetooth connectivity to your project.
Modifying the HC-05 Bluetooth module defaults using AT commands
However, its default settings may need to be changed depending on your application. [Hazim] explains a way to enter the HC-05 AT command mode to benefit from the rich set of features that the device can provide. The process is fairly simple as it only consists of maintaining the key pin of the HC-05 high while powering on. The device then boots in AT command mode with a default 38400bits/s speed and listens for all of the AT command set (PDF). As an example [Hazim] provides a sketch allowing you to write the AT commands directly in your favorite terminal.
With the basics out of your way you may want to further research the hardware, especially if you will be using modules from different sources. They don’t always come with the same firmware.
read the rest of article...

‘Conus’ Mixes Media, Math and Mollusks

We love art installations that use technology in ways probably never before considered, and Moscow media artist [Dimitry Morozov] has done just that with ‘conus’, which reads the surface of mollusk shells and translates the data into real-time audio and video. These shells are unique; their pigmentation generates natural cellular automata. (If you’ve never heard of cellular automata, Conway’s Game of Life is a good example, where a rule set determines whether a cell lives, dies, or regenerates.
‘Conus’ Mixes Media, Math and Mollusks
[Dimitry's] installation uses homemade digital microscopes to scan the naturally-created cellular automata of several shells, each rotating on its own disc. As the shell spins, the scans from the microscopes are fed into an algorithm which transforms the signals into data for multiple audio channels and three video monitors. You can watch the mathematical translation of the biologically-formed patterns in a video after the break.
Check out the MSP430 game of life shield for another example of cellular automata.
read the rest of article...

Sending Data Over Bluetooth Low Energy With a Cheap NRF24L01+ Module

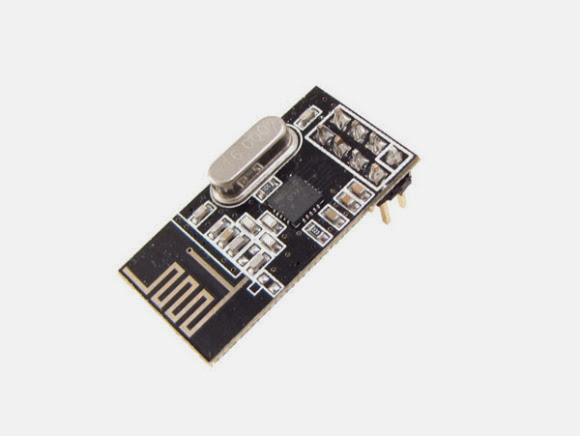
nRF24L01+ modules like the one shown above are a great way to send data wirelessly between your projects. They can be found on many websites for less than $1.50
a piece and many libraries exist for them. After having thoroughly looked at the Bluetooth Low Energy (BLE) specifications, [Dimitry] managed to find a way to broadcast BLE data with an nRF24L01+.
Sending data over Bluetooth Low Energy with a cheap nRF24L01+ module
Luckily enough, BLE and nRF24L01+ data packets have the same preambles. However, the latter can’t send more than 32bytes in a packet and can’t hop between frequencies as fast as the BLE specification wants. [Dimitry] found the solution when he discovered that he could send unsolicited advertisements on three specific channels.

In the end, considering the 32 bytes the nRF24L01+ can send, you’ll need to use 3 bytes for the CRC, 2 for the packet header, 6 for the MAC address and 5 for devices attributes. This leaves us with 16 bytes of pure data or 14 bytes to split between data and name if you want your project to have one.
read the rest of article...

What’s inside a 555?

The 555 timer chip is a ubiquitous piece of technology that is oft-considered the hardcore way of doing things. Of course, the old timers out there will remind us that discrete transistors are the badass way of doing things, and tubes even more so. It’s not quite at the level of triodes and transformers, but Evil Mad Scientist’s discrete 555 kit is still an amazing piece of kit.
What’s inside a 555?
Instead of transistors and resistors etched into silicon as in the OG 555, [Windell] over at EMS turned the basic circuit inside a 555 into a mega-sized version using discrete components. Your parts bins need new scale if you’re going to work with this and other up-scaled hobby electronic components.
Although the integrated stand that makes the whole package look like an overgrown DIP doesn’t break out the signals on the board, it does include some neat screw terminals for alligator clips and bits of wire so this kit can be used in a circuit. Because it uses discrete components, you can also take a meter or scope to check out how a 555 chip works from the inside.
read the rest of article...

Homebuilt 30kV High Voltage Power Supply

If you have need for 30,000 volts to launch your ionocraft (lifter) or power other DIY projects then shuttle over to RimstarOrg’s YouTube channel and checkout [Steven Dufresne’s] homebuilt 30kV power supply. The construction details that [Steven] includes in his videos are always amazing, especially for visual learners. If you prefer text over video he was kind enough to share a schematic and full write up at rimstar.org.
Homebuilt 30kV High Voltage Power Supply
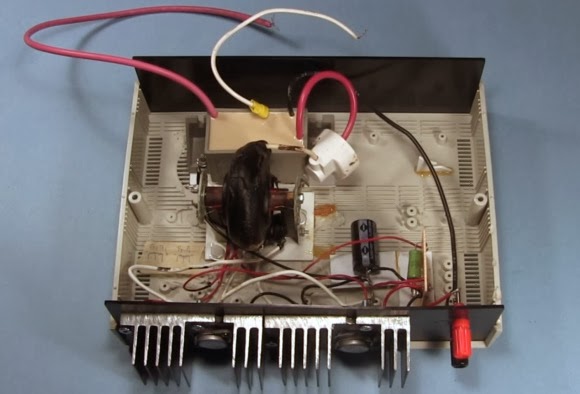
The power supply can be configured for 1.2kV – 4.6kV or 4kV – 30kV at the output while requiring 0-24V DC at the input. In the video [Steven] tries two power supplies. His homemade DC bench power supply at 8V and 2.5A and also a laptop power supply rated at 20V 1.8A DC. A couple of common 2N3055 power transistors, proper wattage resistors, a flyback transformer and a high voltage tripler is about all you’ll need to scrounge up.


The flyback transformer can be found in old CRT type televisions, and he does go into details on rewinding the primary for this build. The high voltage tripler [Steven] references might be a bit harder to source. He lists a few alternates for the tripler but even those are scarce: NTE 521, Siemens 76-1 N094, 1895-641-045. There are lots of voltage multiplier details in the wild, but keep in mind this tripler needs to operate up to 30kV.Join us after the break to watch the video and for a little advice from Mr. Safety.

What good is a high voltage power supply if you don’t travel around in a homebuilt ionocraft just yet? Well maybe you need to electrify your Wolverine claws or Thor’s hammer. We couldn’t close this article without a shout out to the master of high voltage hacks [Photonicinduction] now known as [Photonvids] on YouTube.

Time for Mr. Safety:
Q – Mr. Safety, Is this dangerous?
A – Very! Do not try building something like this unless you really know what you are doing. You can easily be killed by the output and by other points in this circuit. Follow [Steven’s] safety tips when operating such a power supply. Remember to ground the outputs after shutting down. The high voltage tripler can store quite a jolt in its internal capacitors so be careful with that device in and of itself.
read the rest of article...

Reverse Engineering the Sony Ericsson Vivaz High Resolution 640 x 360 Cellphone LCD

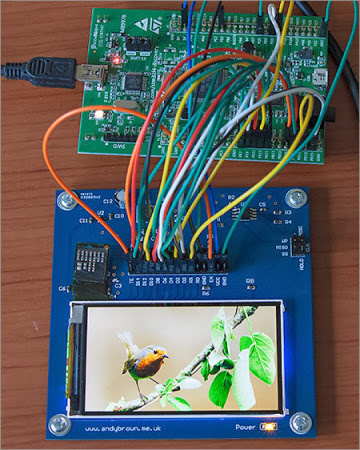
In our opinion, reverse engineering may be one of the best ways to tease your brain. [Andy] just did that by reverse engineering the Sony Ericsson Vivaz high resolution LCD (cached copy here). In his (very) nicely written article, [Andy] explains all the steps that led him to the result shown in the picture above.
Reverse Engineering the Sony Ericsson Vivaz High Resolution 640 x 360 Cellphone LCD
He started by finding the repair manual of the Vivaz, to discover that the display could be interfaced with 8080 type parallel signals. That meant that he could use a standard microcontroller without high speed buses to interface with it, in this case the STM32F4. Next in his adventure, [Andy] ordered the appropriate connector and took a more educated guess for the onboard microcontroller. A long Google search brought up the R61523 from Renesas. So he designed his breakout board, got it produced and a few hours later a nice picture was being shown on the LCD. He even took the time to compare the original display with the clone he found on the webs, and modified his graphics library to support this display.
read the rest of article...

Building A Better Serial Camera

If your next project does anything with cameras or machine vision, you’ll probably be looking at something like a USB webcam attached to an ARM board or a netbook. Sometimes, though, that setup blows will blow your budget – power or otherwise – out of the water. For small projects, you’re limited to small, serial-accessible cameras, and in that domain you really don’t have a lot of choices.
Building A Better Serial Camera
[Ibrahim] realized the cheapest serial cameras are about $35, and with basic image processing that cost skyrockets up to about $100. He set out to build his own alternative, and ended up with an awesome serial camera module that should only cost about $15 in quantity.


The module is built around an STM32F4 microcontroller running at 168 MHz. This micro has a DCMI port to which a OV9650 camera is attached. The resolution ends up being 1280×1024, far better than other serial cameras.

Already [Ibrahim] has the hardware working and a few demo apps. He has a real time color tracking demo (video below) up and running and a machine vision repo for his tiny camera. Now if we could only get a few of these boards on Tindie.
read the rest of article...

Nearspace Environmental Chamber

If you’re going to send some hardware up to 100,000 feet, where atmospheric pressure is 1% of what we enjoy on the surface and temperatures swing down to where Fahrenheit and Celsius don’t matter anymore, you might want to do a bit of testing to make sure everything works before launch. With a few bits of PVC, though, that’s a piece of cake.
Nearspace Environmental Chamber
There were several environmental conditions to take into consideration; the near vacuum experienced by high altitude balloons would be replicated by a refrigerator compressor, the increased solar flux is simulated by a light bulb, and the cold temperatures provided by a chunk of dry ice.


For a proper high altitude, low temperature environmental chamber the test payload should be cooled down via radiation with tubes filled with liquid nitrogen embedded in the walls. This is the NASA way of doing things, but for the budget of $200, [arko]‘s chamber simulates a high altitude environment just fine.
read the rest of article...

Making Logic With Inductors

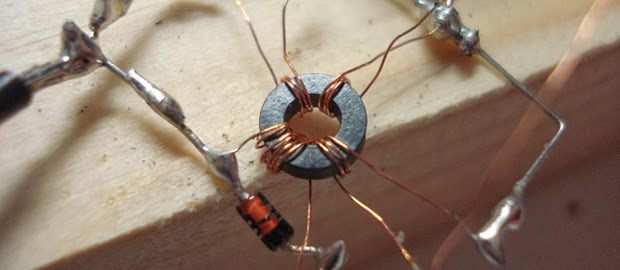
We’ve seen NAND and NOR logic gates – the building blocks of everything digital – made out of everything from marbles to Minecraft redstone. [kos] has outdone himself this time with a logic circuit we’ve never seen before. It’s based on magnets and induction, making a NOR gate out of nothing but a ferrite core, some wire, and a diode.
Making Logic With Inductors
The theory of operations for this magnetic NOR gate goes as follows: If two of the input windings around the core have current passing in different directions, the fields cancel out. This could either be done by positive or negative voltages, or by simply changing the phase of the winding. To keep things simple, [kos] chose the latter. The truth table for a simple two-input, one-output gate gets pretty complicated (or exceedingly cool if you’d like to build a trinary computer), so to get absolute values of 1 and 0, a separate ‘clock’ winding was also added to the core.

One thing to note about [kos]‘ gate is its innovation on techniques described in the relevant literature. Previously, these kinds of magnetic gates were built with square ferrites, while this version can work with any magnetic core.

While this isn’t a very practical approach towards building anything more complex than a memory cell, it is an exercise of what could have been in an alternate universe where tube technology and the transistor just didn’t happen.
read the rest of article...

Custom HTPC and Home Media Server


[Benoit Frigon]‘s builds are a tribute to tidiness: both his HTPC and media server are elegant creations packed full of features. He has quite the knack for clean builds in this form factor; his PBX server was met with high praise earlier this summer.
Custom HTPC and Home Media Server
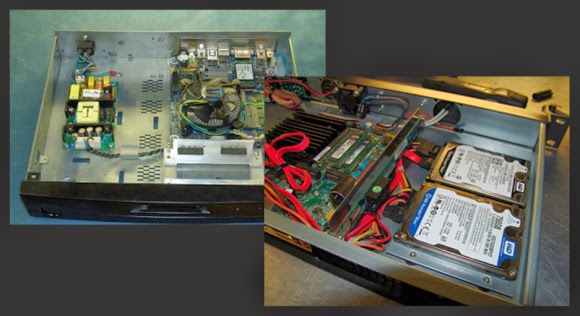
For the HTPC, [Benoit] gutted and cleaned an old DVR case and modified it to house a Mini-ITX board. He added standoff mounts to support the motherboard, then sketched up a template for the IO shield as a guide for cutting the back panel. The front of the DVR case originally had a 4-digit 7-segment display and a few simple buttons. Though he kept the original button layout, [Benoit] chose to replace the segment displays with a 20×2 character LCD. The new display is controlled via a python script on the HTPC, which runs an OpenElec Linux distro with XBMC 12.0.

The HTPC’s hard drive bay is a bit lighter these days, because [Benoit] decided to migrate his media storage to a separate server. Inside the new home media server is yet another Mini-ITX motherboard with an embedded Atom N2800 that runs Ubuntu Server. Live television streams via a WinTV HVR-2550 TV tuner and TVHeadend software.

The case originally suspended the tuner from the IO bracket on the back (and nowhere else), which left the rest of the card dangerously unsupported inside. [Benoit] solved the problem by building an additional aluminum bracket that firmly holds both the PCIe riser and the tuner. Check out both builds’ pages for downloadable templates, software details and bill of materials.
read the rest of article...

Pokewithastick, an Arduino Programmable Web-Logger/Server

[Stewart] tipped us about his very nice project: pokewithastick. It is an Arduino compatible board (hardware, not footprint) based on the ATMEGA1284P which can be programmed to collect and post data to internet logging sites such as Thingspeak or Xively.
Pokewithastick, an Arduino programmable web-logger/server
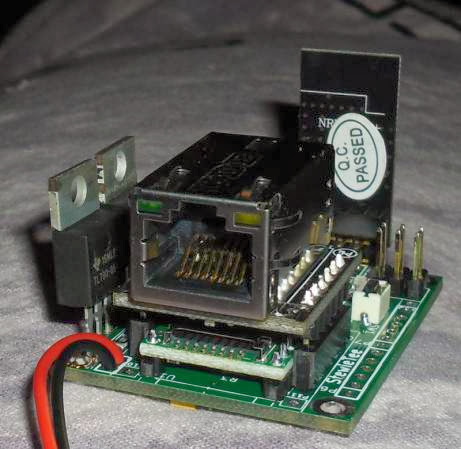
As you can see in the picture above, it has a small 50x37mm footprint (roughly 2″x1.5″). The pokewithastick is composed of an Wiz820 Ethernet module, a micro-SD card slot, 2 serial ports, one battery backed Real Time Clock (RTC), one radio connector (for the usual nRF24L01 2.4GHz radio), one power & user LED and finally a reset button.

There are two power rails on the board which can be split (5v + 3.3V) or combined (3.3v only) which may allow you to connect Arduino shields to it. You can program the board using the standard 6-pin header or via a serial programmer if an appropriate (Arduino) bootloader is installed.The project is open hardware, has been designed using Kicad and all the files can be downloaded as a zip file.
read the rest of article...

Making a Solid-State Relay With I2C interface

As [Mic] often got requests to make high-power switching boards, he recently finally gave in and designed the one shown above based around a solid-state relay. Some of our readers that already play with mains power know that switching should normally occur when the voltage crosses zero volts. The ‘TRIAC BLOC’ is able to do so, which also allows mains frequency measurement. [Mic] then tuned to the internal oscillator of his ATtiny microcontroller with this 50Hz by adjusting its OSCCAL register value, so the switching command can be sent at the ideal moment.
Making a solid-state relay with I2C interface
Zero crossing detection is implemented by feeding the mains into an AC optocoupler. [Mic] discovered that the optocoupler diodes are not identical, so he had to adjust his firmware to account for the time differences.
All the resources are available on github, we would be interested to hear your detailed analysis of the circuit implemented with the passives R3/C1/L1/R8/C3.
read the rest of article...

Duo Basic: An All-Logic Chip Educational Computer

Way back before the days of microcomputers, a few very lucky students first got their hands wet with microcomputer trainers. These simple devices used common logic chips, lights, and switches to perform calculations; basically, a very small and simple computer.[Jack] has just released his DUO Basic 8-bit educational computer, a computer designed entirely around logic chips just as was done in the olden days.
Duo Basic: An All-Logic Chip Educational Computer
The entire computer except for a single EEPROM giving the computer 256 bytes of ROM, three registers, and two instructions (condition jmp and add). This allows for simple programs to be written just by flipping switches and hitting buttons – it doesn’t get much more ‘bare metal’ than that.

[Jack] has an online assembler and emulator for the DUO Basic along with a few example assembly programs. Of course, all the schematics and block diagrams are available on his site, along with a nice introductory video, shown below.
read the rest of article...

A cortex M4 Based Platform With ETH, USB, BT and Many on-Board Peripherals

Here is a very time consuming project that I worked on during last summer: an ARM Cortex M4 based platform with plenty of communication interfaces and on-board peripherals. The particular project for which this board has been developed is not really HaD material (one of my father’s funny ideas) so I’ll only describe the platform itself.
A cortex M4 based platform with ETH, USB, BT and many on-board peripherals
The microcontroller used in the project is the ATSAM4E16C from Atmel, which has 1Mbyte of flash and 128Kbytes of SRAM. It integrates an Ethernet MAC, a USB 2.0 Full-speed controller, a sophisticated Analog to Digital Converter and a Digital to Analog Converter (among others).

Here is a list of the different components present on the board so you can get a better idea of what the platform can do: a microphone with its amplifier, a capacitive touch sensor, two unipolar stepper motors controllers, two mosfets, a microSD card connector, a Bluetooth to serial bridge, a linear motor controller and finally a battery retainer for backup power. You can have a look at a simple demonstration video I made, embedded after the break. The firmware was made in C and uses the Atmel Software Framework. The project is obviously open hardware (Kicad) and open software.
read the rest of article...

Reverse Engineering the Sony Ericsson Vivaz High Resolution 640 x 360 Cellphone LCD

In our opinion, reverse engineering may be one of the best ways to tease your brain. [Andy] just did that by reverse engineering the Sony Ericsson Vivaz high resolution LCD (cached copy here). In his (very) nicely written article, [Andy] explains all the steps that led him to the result shown in the picture above.
Reverse Engineering the Sony Ericsson Vivaz High Resolution 640 x 360 Cellphone LCD
He started by finding the repair manual of the Vivaz, to discover that the display could be interfaced with 8080 type parallel signals. That meant that he could use a standard microcontroller without high speed buses to interface with it, in this case the STM32F4. Next in his adventure, [Andy] ordered the appropriate connector and took a more educated guess for the onboard microcontroller.

A long Google search brought up the R61523 from Renesas. So he designed his breakout board, got it produced and a few hours later a nice picture was being shown on the LCD. He even took the time to compare the original display with the clone he found on the webs, and modified his graphics library to support this display.
read the rest of article...

Building A Better Serial Camera

If your next project does anything with cameras or machine vision, you’ll probably be looking at something like a USB webcam attached to an ARM board or a netbook. Sometimes, though, that setup blows will blow your budget – power or otherwise – out of the water. For small projects, you’re limited to small, serial-accessible cameras, and in that domain you really don’t have a lot of choices.
Building A Better Serial Camera
[Ibrahim] realized the cheapest serial cameras are about $35, and with basic image processing that cost skyrockets up to about $100. He set out to build his own alternative, and ended up with an awesome serial camera module that should only cost about $15 in quantity.

The module is built around an STM32F4 microcontroller running at 168 MHz. This micro has a DCMI port to which a OV9650 camera is attached. The resolution ends up being 1280×1024, far better than other serial cameras.
Already [Ibrahim] has the hardware working and a few demo apps. He has a real time color tracking demo (video below) up and running and a machine vision repo for his tiny camera. Now if we could only get a few of these boards on Tindie.
read the rest of article...

Nearspace Environmental Chamber

If you’re going to send some hardware up to 100,000 feet, where atmospheric pressure is 1% of what we enjoy on the surface and temperatures swing down to where Fahrenheit and Celsius don’t matter anymore, you might want to do a bit of testing to make sure everything works before launch. With a few bits of PVC, though, that’s a piece of cake.
Nearspace Environmental Chamber
There were several environmental conditions to take into consideration; the near vacuum experienced by high altitude balloons would be replicated by a refrigerator compressor, the increased solar flux is simulated by a light bulb, and the cold temperatures provided by a chunk of dry ice.

Proper a high altitude, low temperature environmental chamber, the test article should be cooled down via radiation with tubes filled with liquid nitrogen embedded in the walls. This is the NASA way of doing things, but for the budget of $200, [arko]‘s chamber simulates a high altitude environment just fine.
read the rest of article...

Modifying the HC-05 Bluetooth Module Defaults Using AT Commands

The HC-05, a Bluetooth to serial bridge, can be found for around $5 on the internet and therefore may be the cheapest way to add Bluetooth connectivity to your project.
Modifying the HC-05 Bluetooth module defaults using AT commands
However, its default settings may need to be changed depending on your application. [Hazim] explains a way to enter the HC-05 AT command mode to benefit from the rich set of features that the device can provide. The process is fairly simple as it only consists of maintaining the key pin of the HC-05 high while powering on. The device then boots in AT command mode with a default 38400bits/s speed and listens for all of the AT command set (PDF). As an example [Hazim] provides a sketch allowing you to write the AT commands directly in your favorite terminal.
With the basics out of your way you may want to further research the hardware, especially if you will be using modules from different sources. They don’t always come with the same firmware.
read the rest of article...

‘Conus’ Mixes Media, Math and Mollusks

We love art installations that use technology in ways probably never before considered, and Moscow media artist [Dimitry Morozov] has done just that with ‘conus’, which reads the surface of mollusk shells and translates the data into real-time audio and video. These shells are unique; their pigmentation generates natural cellular automata. (If you’ve never heard of cellular automata, Conway’s Game of Life is a good example, where a rule set determines whether a cell lives, dies, or regenerates.
‘conus’ mixes media, math and mollusks
[Dimitry's] installation uses homemade digital microscopes to scan the naturally-created cellular automata of several shells, each rotating on its own disc. As the shell spins, the scans from the microscopes are fed into an algorithm which transforms the signals into data for multiple audio channels and three video monitors. You can watch the mathematical translation of the biologically-formed patterns in a video after the break.
Check out the MSP430 game of life shield for another example of cellular automata.
read the rest of article...

Graffiti Briefcase for Stealth Tagging

We’re floored by painter and engineer [Bob Partington's] graffiti briefcase, which proves how well art and tech can complement one another. Fear not, Arduino haters, [Bob]‘s case is an analog dream: no microcontrollers here.
Graffiti briefcase for stealth tagging
The guts consist of 2 components: a linear drive system and a trigger assembly. The former takes advantage of a small RC motor with a chain drive which slides the can’s mounting unit along two stainless steel rods. The latter includes a custom wound solenoid plugged into a 24V cordless drill battery, which slams down 5 pounds of force onto the can’s nozzle to fire the paint.


This all fits into an otherwise inconspicuous looking briefcase to provide some urban camouflage. The final component is a stencil, which slides into a rectangular hole on the bottom of the case. The paint can sprays downward through the stencil and tags the ground at the touch of a brass button located near the handle.  [Bob] has plenty of other cool inventions you should check out that are less illegal. Or, stick it to the man by automating your tagging with Time Writer.
read the rest of article...